filmov
tv
Compiling Assembly Code with GCC for STM32

Показать описание
Discover how to successfully compile assembly code for STM32 using GCC, resolving common issues and understanding the process step-by-step!
---
Visit these links for original content and any more details, such as alternate solutions, latest updates/developments on topic, comments, revision history etc. For example, the original title of the Question was: Compiling assembly code with gcc for STM32
If anything seems off to you, please feel free to write me at vlogize [AT] gmail [DOT] com.
---
Compiling Assembly Code with GCC for STM32: A Step-by-Step Guide
When working with embedded systems like the STM32, you may encounter challenges when compiling assembly code. Many developers, including those who are not entirely proficient with GCC, find themselves running into cryptic error messages. In this guide, we will explore how to compile a basic assembly program for STM32 using GCC, and resolve common compilation errors along the way.
The Problem
You may have attempted to compile a simple assembly program using the command:
[[See Video to Reveal this Text or Code Snippet]]
However, you might have received an error indicating:
[[See Video to Reveal this Text or Code Snippet]]
This happens because the linker expects a main entry point to your program, especially when the default linker settings are applied. Let's go through how to modify your assembly code to avoid this error and successfully compile your program.
The Solution: Step-by-Step
1. Modify Your Assembly Code
To ensure that your program has a proper entry point, you need to create a handler, often referred to as a Reset_Handler. The modified assembly code would look like this:
[[See Video to Reveal this Text or Code Snippet]]
Key Changes Made:
Defined a global label ResetHandler which serves as your program's entry point.
Used .space 0xf8 to ensure code alignment on a 4-byte boundary.
Modified the initial address to 0x08000100.
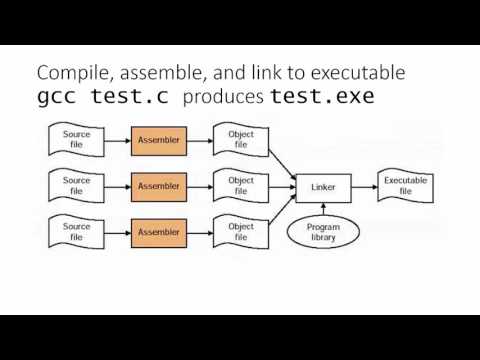
2. Compiling and Linking
To compile your modified assembly program, use the following command:
[[See Video to Reveal this Text or Code Snippet]]
Explanation of Command:
-nostartfiles: This tells the linker not to use the default startup files.
-nostdlib: This prevents linking against the standard library, which is not needed for bare metal programming.
-e ResetHandler: It sets the entry point for the program.
-Wl,-Ttext,0x080000: It specifies the start address for the text section.
3. Disassembling and Inspecting the Output
Now that you have compiled your code without errors, you can inspect the output using:
[[See Video to Reveal this Text or Code Snippet]]
This command will display the disassembled content of your code, allowing you to verify that it was compiled correctly.
4. Next Steps
After successfully compiling and running your assembly program, consider taking the following actions to deepen your understanding:
Explore GCC/Ld Tutorials: Find guides specific to your STM32 model to leverage its features effectively.
Learn GNU Ld Linker Scripts: Familiarize yourself with linker scripts, which are crucial for embedded development.
Understand GCC/Ld Command-Line Options: Knowing the various options can help you customize builds to your requirements.
Conclusion
Compiling assembly code for STM32 systems with GCC can be daunting, but by ensuring you have a correct entry point and modifying your assembly code as shown, you can overcome common compilation issues. With practice and the right resources, you'll become more proficient in embedded programming.
If you have any questions or need further assistance, feel free to reach out or consult online forums dedicated to STM32 development!
---
Visit these links for original content and any more details, such as alternate solutions, latest updates/developments on topic, comments, revision history etc. For example, the original title of the Question was: Compiling assembly code with gcc for STM32
If anything seems off to you, please feel free to write me at vlogize [AT] gmail [DOT] com.
---
Compiling Assembly Code with GCC for STM32: A Step-by-Step Guide
When working with embedded systems like the STM32, you may encounter challenges when compiling assembly code. Many developers, including those who are not entirely proficient with GCC, find themselves running into cryptic error messages. In this guide, we will explore how to compile a basic assembly program for STM32 using GCC, and resolve common compilation errors along the way.
The Problem
You may have attempted to compile a simple assembly program using the command:
[[See Video to Reveal this Text or Code Snippet]]
However, you might have received an error indicating:
[[See Video to Reveal this Text or Code Snippet]]
This happens because the linker expects a main entry point to your program, especially when the default linker settings are applied. Let's go through how to modify your assembly code to avoid this error and successfully compile your program.
The Solution: Step-by-Step
1. Modify Your Assembly Code
To ensure that your program has a proper entry point, you need to create a handler, often referred to as a Reset_Handler. The modified assembly code would look like this:
[[See Video to Reveal this Text or Code Snippet]]
Key Changes Made:
Defined a global label ResetHandler which serves as your program's entry point.
Used .space 0xf8 to ensure code alignment on a 4-byte boundary.
Modified the initial address to 0x08000100.
2. Compiling and Linking
To compile your modified assembly program, use the following command:
[[See Video to Reveal this Text or Code Snippet]]
Explanation of Command:
-nostartfiles: This tells the linker not to use the default startup files.
-nostdlib: This prevents linking against the standard library, which is not needed for bare metal programming.
-e ResetHandler: It sets the entry point for the program.
-Wl,-Ttext,0x080000: It specifies the start address for the text section.
3. Disassembling and Inspecting the Output
Now that you have compiled your code without errors, you can inspect the output using:
[[See Video to Reveal this Text or Code Snippet]]
This command will display the disassembled content of your code, allowing you to verify that it was compiled correctly.
4. Next Steps
After successfully compiling and running your assembly program, consider taking the following actions to deepen your understanding:
Explore GCC/Ld Tutorials: Find guides specific to your STM32 model to leverage its features effectively.
Learn GNU Ld Linker Scripts: Familiarize yourself with linker scripts, which are crucial for embedded development.
Understand GCC/Ld Command-Line Options: Knowing the various options can help you customize builds to your requirements.
Conclusion
Compiling assembly code for STM32 systems with GCC can be daunting, but by ensuring you have a correct entry point and modifying your assembly code as shown, you can overcome common compilation issues. With practice and the right resources, you'll become more proficient in embedded programming.
If you have any questions or need further assistance, feel free to reach out or consult online forums dedicated to STM32 development!
 0:06:58
 0:01:46
 0:02:14
 0:11:49
 0:10:11
 0:02:44
 0:04:06
 0:12:10
 0:00:48
 0:02:36
 0:07:30
 0:01:29
 0:01:43
 0:26:15
 0:01:29
 0:05:43
 0:00:43
 2:29:32
 0:00:10
 0:11:11
 0:09:25
 0:07:18
 0:38:44
 0:10:02