Wish I Built This Car Ramp Years Ago

preview_player
Показать описание
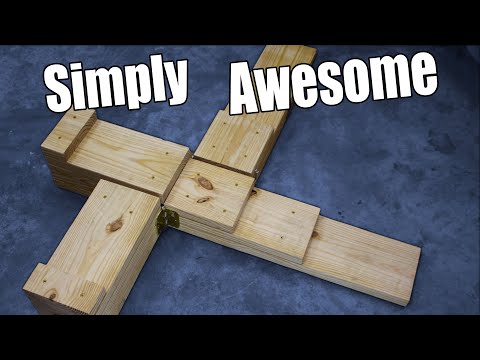
Do you ever need to work on your car?
Then a good set of car ramps is a necessity!
A set of metal ramps can work, BUT they keep getting in the way and it's hard to move around them.
Plus they don't work with every car.
So let's see if we can improve upon this design with a set of custom wooden car ramps.

Hooks:

If you would like to help support our channel, please use our affiliate page on Amazon (paid link), were we have listed a bunch of items we suggest.
Just follow this link:
Amazon Product Suggestions:
(There is NO extra cost to you.)

Use of video content for personal projects is at your own risk.
Your results may vary depending on type of materials, your craftsmanship, and tools at hand.
We are not responsible for any damages or injuries that might occur.
Some links in description are affiliate links that let you help support our channel at no extra cost to you.
#carramps #automotive #diy
Matthew 17:20-21
Рекомендации по теме
Комментарии
Автор

Friend, I've been building my own ramps for 50+ years, and the swing away on this is the most clever alteration I have ever seen. At 72 I still like learning one new thing every day. Thx! Pr: 15:22

FisherCatProductions
Автор

Love the way you have organized this video - clear, concise, no annoying background "music", you stick to the topic, and you treat the viewer as an adult by fast forwarding repeat operations. So many how to videos pad the show with unnecessary length, using 20 minutes to explain what should take 2 minutes.

wdoxsee
Автор

Built a set of these last weekend after having 2 floor jacks that wouldn't lift my Explorer & Expedition.
Went with 2x10 for the wider tires on the Expedition, also added a small grab handle on the latch side to make carrying them around a bit easier.
Thanks for the short & concise guide.

johnamador
Автор

I did this decades ago when I had a very low car. Mine were about 6' long. I also chamfered off the ends of the boards. They kept scooting away instead of climbing them so I attached a 12" flap of tire tread to the end of the ramp. The car would get on that first and it would hold the ramp in place.

richardbrant
Автор

Great video, great design!
My only concern- I would want to add more height to the 3” block on top. As you stated earlier, it’s easy for tires to climb a 2x4, so I think it would be good to make it harder to climb over the “STOP” block, and at the same time make it more apparent to the driver that they have indeed reached the top and should stop.

mjenx
Автор

The thought put into storing them together, and not using the last 4 inches was my favorite part!

drumset
Автор

An addition of 1/4" of rubber material underneath the main base would do 2 things; 1) prevent the ramp from sliding. 2) Create enough space to avoid the hinged section from being in a bind with the ground or floor surface. It would likely put you over the $20 limit, but would add some safety!

marlonfannin
Автор

I built one years ago, for my personal use. My ramps are detachable.
During Desert Storm, I used the same basic design to get our KC-135R nose gear up high enough, to use a main landing gear Jack, on the nose gear, to change the nose gear tires. The tanker weighed about 150, 000 during tire changes.

robertheinkel
Автор

I made a similar set years ago - just not foldable. I didn't trust the flimsy plastic or even sheet metal ramps you can buy
Here is what I added: In fact I found it necessary to make a slanted cut on the bottom board, to facilitate driving onto the ramp. Without that, I found that the car would often push the ramp around on the concrete garage floor. Once the car is on the first board with all its front weight, the ramps move nowhere.
Also, I found that with wet wheels - and ramps - the wheels would easily skid. So I applied a coat of structure paint - actually just some oil paint mixed up with cat litter gravel. This is the same trick you sometimes use on boat decks to avoid slippery surfaces.
There has been times where the lower boards were in the way, so I like your elegant and simple solution to that problem

viggosimonsen
Автор

Pretty cool. I don't think 6" is enough lift, so I'd make it 9", and 9.25" wide. Rubber padding on the bottom to grip the floor. The first "step" is worth cutting the 45 into, allows you to really wedge it in there at the start. A longer top step with a 3/4" high reverse stop would be nice.

trevorlambert
Автор

Great video. Thanks for not doing a lengthy 30 min video just to show something so simple and straightforward. I wish there were more content creators like you. Have a nice one

stinowyt
Автор

Great idea with an excellent presentation, quick and right to the point. All the needed info without all the unnecessary talk that often accompanies it! I've been meaning to build wood ramps for many years, and this solves the problems. Thank you!

michaelzeleznik
Автор

I built ramps like this a while back, not the hinging blocks but the ramps in general. I love those things! I had the metal ones many many many years ago. The issue I had with the metal ones was, lots of times they would slide quite a bit on me when I would be trying to pull the vehicle on to them. The wood ones are heavy and have never slid on me. If you live in a town with lots of new home construction, you can find enough boards easily in the dumpsters on these sites.

SVMSICE
Автор

My next project when I get home. No criticism from me. Great idea thank you

pollyperkins
Автор

I love how this video is fast-paced like a TikTok video, but it's in 16:9 and still comprehensive. I'm so tired of people thinking consiseness means "as short as possible". You actually understand that you have to actually convey information efficiently to be concise instead of just narrowing it down to basics.

awesomeferret
Автор

Also, typical steel ramps tend to be too steep for lower vehicles, yours look to provide a more gentle rise allowing them to be used with more vehicles. Great project!

rusack
Автор

This is a great idea. From the simplicity of using one piece of common lumber for construction, the hinge and hook setup, and the fact that they stack into a neat, rectangular shape.

elebeu
Автор

Very well done.
An easy way to keep the tires on 2 ramps without going over the stop blocks is to put the chok in front of the rear wheel. It should be the same distance ahead of the rear tire as the front tire is to the stop block.
Also - the 4" scrap, an empty soda can or the like on top of the stop block, placed so that the tire pushes it off the ramp as it rolls into place. With the window open listen for it to fall.

VicVelez-tfrd
Автор

I'm catching your channel for the first time. I love how basic you've made this, cheap, approachable, and possible with tons of different tools. Thank you for making great content

Jbeats
Автор

I did something like this about 10 years ago but instead of using hinges I used metal clasps which allow me to completely separate the two parts of the ramp. This makes it easier to carry them, as they can be rather heavy. Part of the reason for the weight is that I used 2 X 12's as I found some 10 foot ones at a building surplus store. Plus the extra width damps down my nerves a little when I drive up the ramps! Also made a set for the rear so I can have all 4 wheels on the ramps which allows me complete movement under the car.

deirdre
join shbcf.ru