How to make a drypoint print from black plexiglass - Printmaking Tutorial

preview_player
Показать описание

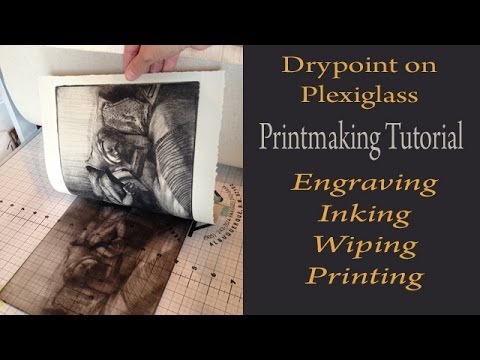
Printmaking demo of a drypoint engraving made with black (as opposed to clear or white) plexiglass. The dark color of the plate makes scribed line work much more visible while in process, which results in less eye fatigue. This was an experiment that went well, so I'm sharing the process here. After sketching and drawing the details of a flower and cup on the plate, I inked the surface, and printed the drypoint on my etching press.

Visit my Etsy Shop to see work for sale from my studio:

Subscribe to my art studio newsletter for exhibit news, discount codes and art announcements:

Supplies & online resources are listed below.

Utility Knife

Cork-backed stainless 18" Ruler

Non Skid Mat

Rubber tipped spring clamps

12" metal flat file (rasp)

Twisted Scribe (or Whistler's Needle)

Cork Handled Etching Needle/Scribe
(this one was used in the video)

Carbide Point Etching Needle/Scribe

Black Acrylic/Plexiglass

Rubber Gloves

spatula for mixing/laying out ink

Akua Ink starter set

Akua MagMix (modifier to thicken the ink)

Akua Transparent Base

storage jars for leftover ink

Apron

BFK Rives paper

Tarlatan wiping cloth

Pointed Q-tips

Takach etching press

#printmaking #drypoint #engraving #etching

You can find me here:

(Note: This video includes affiliate links, which costs nothing to you, but helps keep my art supplies stocked. Thanks for supporting my art studio so I can share my experiments here with you!)
Рекомендации по теме
Комментарии
Автор

Thanks for black plexi idea. Never knew of that.

marlenevidibor
Автор

Dear Belinda,

I'm the person who was trying to print on a small press from laser-etched plexiglass / acrylic with kids at a summer camp (Gr. 2 - 6). At first I had lots of trouble getting anything to print at all, and you gave me suggestions that were really helpful!

1 -- Thanks for the reminder to moisten the paper before printing -- this alone made a BIG difference.

2- You also suggested thickening the ink with mag medium before applying it to the plate. This helped a lot, and we used plastic cards to push the ink into the grooves, instead of breyers, before wiping the excess off with wiping cloths. (Suitable cards available at every Starbucks!)

3- I let them use some better quality printing paper in addition to the sumi-o paper we had been using previously. That helped too.

Also, I found out that kids that age were thrilled with less-than-perfect prints from their plates. They were very proud of their prints, even if they were uneven or lacking in some way (things that an adult might be upset about). The kids all took to heart my telling them that every print is an experiment, you learn by trial and error, etc. They prized their plates too, rather than seeing them only as a tool for making prints.

I had considered that possibly we were cleaning the grooves too thoroughly by washing the grooves with a soft toothbrush (and therefore the ink might be lacking something to adhere to in the grooves), but we decided against skipping this step because the laser cutter left a significant amount of powdery dust in the grooves.

All in all, the kids had a great time and really seemed to enjoy themselves. I had them watch a few of your videos, and next year we'll watch more. It gives them a better idea of what they'll be doing and your explanations of why we do each step are great.

FYI: Some of them were not yet developmentally able to understand every step. I tried to explain "mirror image” to them and one boy had a really hard time. He finally understood that "writing the letters backwards" didn't mean spelling your name A-D-N-I-L-E-B, but I don't he ever really understood the concept. This was clear on the last day, when I gave each kid a folder to put their prints in, and told them to write their names in marker on the cover. This same boy asked me if he should write his name forwards or backwards!

Thank you thank you thank you Belinda for all your help.

Susan Mayer

dasueliness
Автор

Good job! Very competently made vid. Thank you!

MarkMcCluney
Автор

I am a big fan of printmaking. I just recently discovered it and I am totally in love. I have access to a printing press and that makes life so much easier. Thank you so much for creating these fantastic videos. What a treasure.

GabrieleBitter
Автор

Super tutorial!!!  I love working with printing, but never tried on plexiglass so this sure makes me wanting to try.

mjbrown
Автор

I am fascinated by the process and your lovely results!

BelindaPort
Автор

Hello Belinda,
I have had some success with transparent plexi, but have not tried on black. Great idea as usual!

leslyschannel
Автор

I love your videos. I’ve just started dry point… how do you transfer your drawing onto black plexiglass?

catewilton
Автор

Have never tried this but your video  sure makes it look exciting, saw your 1st video too with the clear Plexiglas. The biggest problem is getting hold of a press :/ 

DesmondClancy
Автор

Hi Belinda, I am a printmaker for 25 years, I recently was recommended to your site by another printer who thought you could show me a way to engrave plexi easier. I love this black plexi idea! I am ordering some from amazon and wondered what size do you use on your press. 1/4" or 1/8 " and do you use your blankets ? Thanks

martischmidt
Автор

great instructional video.  Just getting interested in this.  What kind of ink or paint do you use?

sylvanep
Автор

Hi Belinda, can dry point also be used with copper plates for example?And if so, does the plate need any special care for printing/etching. Also, have you heard of acrylic-resist etching?I have come across it one day and wanted to ask if you had have tried it. Thank you for the great videos!

MissNausicaa
Автор

Great tutorial like always!
How deep do I have to go on the plexyglass? when scratching?
I already cut a few pieces and I am ready to start!.

Thanks!

markoartist
Автор

I have been trying to print from plexiglass plates that have been etched with a laser cutter (great idea, but I've yet to have success with it!). Theoretically, the laser- etched plate should be the same as a dry-point etched plate.

But I am having difficulty getting the ink to stay in the grooves, and very little success getting the ink to print onto the paper when I put it through a small press. Do you have any suggestions on where to start in figuring out what is going wrong? We've used sumi-o paper and akua inks, wiped the plates clean with wipe cloths, and can see ink in the etched grooves. Perhaps wetting the paper will help, but any other ideas? I love your videos and have learned an enormous amount from them.

dasueliness
Автор

Great Video. I have also laser engraved a pattern on black acrylic. Is it possible to make the engraved design led backlit?

gilfoyle
Автор

Thanks for the video! Can you tell me how you drew your image onto the black plexi?

LittleKatK
Автор

Hi Belinda, I am working on your drypoint on drafting film technique and wondered if you could talk "starter" etching presses, table top models, for those of us who wish to dive into an area that takes a little more than pulling prints by hand? Where do I start? Used or new? Antique or modern? Any advice appreciated. Thanks for the great videos!

janpartain
Автор

Shucks I just got some clear plexiglass... could I put a thin layer of acrylic paint on one a achieve the same results I wonder?

peterhinton
Автор

I've been printing my designs first onto A4 sheets on to the shiny part of sheets of labels I removed the labels from... then covered the surface of the plexiglass sheet with a thin layer of PVA or wood glue with a soft roller as even as possible. Then I place the ink sheet carefully over it and wait for a few hours or longer for it to dry. The sheet just peels off and the design is perfectly carried across. For etching on plexiglass I've been scratching away at the dark part of the image and then at the end wash the plate of the tiny pieces that are left at the end. It actually works! But that wouldn't work on black plexiglass now would it! Damnation my method isn't applicable in every situation!!!

nachtschimmen
Автор

It looked like you had colors in your final print. True?

sunnypoint