filmov
tv
How to Add Transformers 3D Models into our Scene in Adobe After Effects | Easy Tutorial NO PLUGINS

Показать описание
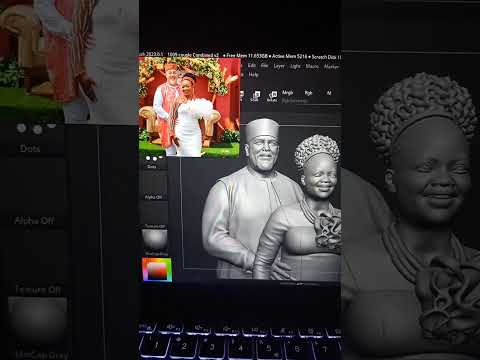
In this Adobe After Effects tutorial, we will be adding 3D models into our scene in a very simple and easy way. The latest version of Adobe After Effects 2024.5 allows us to add 3D models directly into our scene without the use of any third-party plugins. We will be integrating Optimus Prime from Transformers into our scene.
Resources:
Steps:
1. Track the Scene with 3D Camera Tracker:
- Open your footage in Adobe After Effects.
- Apply the 3D Camera Tracker effect to your footage.
- Allow After Effects to analyze and solve the camera motion.
- Once tracking is complete, create a camera and null from the tracking data.
2. Add Shadow Catcher, Light, and Camera:
- Create a new solid and apply the Shadow Catcher effect to it.
- Adjust the light settings to match the lighting of your scene.
- Add a 3D light to the scene to interact with your 3D model.
3. Import and Position the 3D Model:
- Download the Optimus Prime 3D model from one of the provided links.
- Import the 3D model into After Effects.
- Position and scale the 3D model to fit into your scene.
- Adjust the rotation and placement to match the perspective of the tracked footage.
4. Use HDRI for Environment Lighting:
- Download an HDRI lighting image from Poly Haven.
- Apply the HDRI image to the environment light settings of the 3D model.
- Adjust the intensity and rotation of the HDRI to match the lighting and reflections in your scene.
5. Final Adjustments:
- Fine-tune the shadows, lighting, and reflections to make the 3D model blend seamlessly with the background.
- Adjust the color grading and add any final effects to match the overall look of your scene.
By following these steps, you'll be able to integrate a 3D model into your footage in Adobe After Effects 2024.5 easily and effectively. Enjoy experimenting with different models and lighting setups to create stunning visual effects!
 0:10:22
How to Add Transformers 3D Models into our Scene in Adobe After Effects | Easy Tutorial NO PLUGINS
 0:00:16
3d Printing Process #transformers #3d #3dprinting #inventor #autocad
 0:00:21
I 3D Printed Optimus Prime #transformers #shorts #3dprinting #optimusprime
 0:00:41
How to connect 3D Printed Parts!
 0:00:14
Installed lights in Optimus! Now i wanna build his sword :) #cosplay #bumblebee
 0:00:13
Send Image get STL file. As simple as that!!
 0:00:22
3D Printing OFFICIAL Transformers: Rise of the Beasts AT HOME! #shorts
 0:00:16
SELF TRANSFORMING OPTIMUS PRIME!!!
 0:00:30
Bring Classic Character with 3D Printing! ✨ #3dprinting #3dprinted #phrozen
 0:00:20
She built The Most REALISTIC Optimus Prime Transformers Costume | 3D PRINTING + EVA FOAM
 0:00:16
3D printed Transformer! #3dprinting #shorts #toys
 0:00:23
This helmet is so real! Megatron! #transformers #megatron #unboxing #optimusprime #robot
 0:00:39
How to wear the 2.6m tall Bumblebee costume ? 😍
 0:00:10
Optimus Prime transformation | #shorts #transformers #optimusprime #autobots
 0:00:16
Transformer Costume That Really Convert, Bumblebee Transform Fancy Dress
 0:00:17
We Have New Members Coming! #figure #lego #actionfigures
 0:00:08
Megatron Transformers G1 - Impresión 3D #SHORTS
 0:00:23
The Only Way You Should Add Blood To LEGO Minifigures #shorts
 0:00:25
Transformer Toys in action!
 0:00:11
3d printed battery holder and Transformer #3d #3d printing #transformers #TFAnimated
 0:00:21
JUST LIKE THE COMMERCIAL 🤯🤯🤯 #transformers #optimusprime #toycommercial
 0:00:11
Coolest Transformer Toy!
 0:11:30
Transformers Legacy Menasor with 3D Printed leg add-on
 0:00:28
A 3D Printed Optimus Prime #transformers #optimusprime #3dprinting
Комментарии