filmov
tv
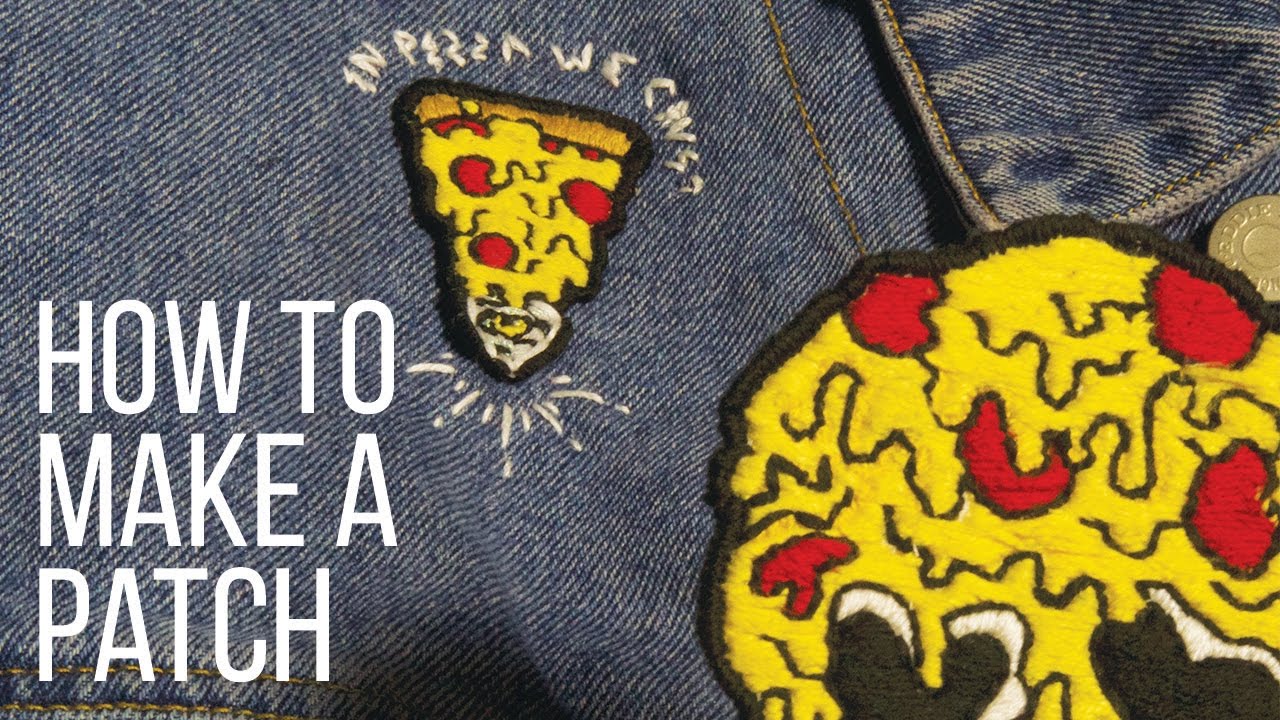
How To Hand Make a Patch
Показать описание
Whhaaaaaaatup! What up guys. So today i'm going to show you how to hand stitch a patch.
So get your embroidery backing, cloth (fabric), and your image, along with hoop and your embroidery floss. next put your image under the backing and begin to trace it. I want the reverse image of [my drawing] so what I did is I flipped the backing around and put my cloth on top.
Now take your hoop. Place the smaller one underneath and begin to loosen the top one. you'll want it loose enough so you can place it over the cloth and the smaller hoop. Now pull on the edges of the cloth so it gets tight like a drum. I started with yellow because that will be the majority of the patch's color. You can turn on the light on on your phone and put that underneath so you can see where your image is.
your going to make your fist stitch from the bottom, tie a knot at the end of your string, and then come back on top. I like to start where the very top of the yellow will be and work my way down from there with a bunch of horizontal stitches. Just line by line, starting from right coming up from the back then coming in from the top on the left side.
I found that things ran a whole lot smoother if you cut of your excess string from that very first stitch you made.
If you run out of string or you are done with your first color, You're going to cut it and your going to split that sting in to two separate [stands] its made out of 6 lil strings so its going to be 3 and 3. you take one of the 3/s and sew it under the last stitch you made. and then proceed to make a square knot. left over right and right over left. And again cut off any extra string.
So to do the next colors just do like you did the first. tie a knot at the end of your sting and come in through the back and just layer it on there top to bottom. So rather than going horizontal for lines, on the crust i did vertical ones. Just to change things up.
once you get all your colors finished your going to add in your lines. you start this like any other. to fill in the line in this patch what you are going to do is your going to come from the back a little bit ahead of where you want your line to end then go down through the front where you want it to start. and your just going g to keep on doing this over and over again till you have all those lines filled in.
Next add a little bit of glue to stop it from fraying. add a dab of glue around the entire edge of the patch. once its dry you are ready for the last step: adding the outside line.
start from the back and pull up. where you think you would go back around and come up again from the back, you don't. you are going to make the next stitch from the top going down. any extra sting you have from the first stitch you can sew right around it, covering it up. mine was pretty long, so i did end up cutting it off.
now you're going to want to work your way around the entire patching. working side by side. making things as close as possible, that way no cloth underneath will be shown.
you end it just like any other one. split it in half. 3 and 3. take one of those, sew it through and tie a square knot. cut off any excess and vuala you have your patch. place it where you was it and your done! Looks good!
This is my Amazon Associate links with the brands I use.. but really you can get the supplies almost anywhere:
Follow me and watch the art process:
Like. Comment. Share.. or what ever..
 0:00:21
How to make a artificial Working Cardboard Hand 😏 #shorts
 0:00:16
How to Make a Hand Fan! 🌬️📄
 0:00:19
MAKE A ROBOTIC HAND
 0:00:30
Make A Robotic Hand 🤩#shorts
 0:00:26
MAKE A ROBOTIC HAND
 0:00:54
EASIEST Spiral bouquet technique for beginners HOW TO MAKE A SPIRAL HAND TIED BOUQUET OF ROSES #diy
 0:00:15
How to make robotic hand with paper se robot hand Kaise banaen robot hand making ideas paper hand
 0:05:53
Diy Hand Sewn Scrunchy Tutorial | How To Make A Scrunchies | Hand sewing | Scrunchy costurado à mão...
 0:01:00
easy, step by step tutorial on hands 🤞 #art #drawing #trending #sketch #artist #hand #shorts #viral...
 0:00:13
How can make snake with hand @anuj_tutter00 #magic #snake #hand
 0:00:06
How to🖐make hand shadows #hand #shadow #art #ladka #ladki #youtube #pakketarkhan2506 #animals #fun...
 0:04:06
How To Make a Robotic Hand | DIY Paper Robot Hand | Science Project
 0:00:30
how to make a paper hand finger shape #diy #craft
 0:00:29
how to make a hand fan #diy #craft #shortvideo #shorts
 0:00:13
Let's Make A Tiger Head Hand Puppet With The Children | DIY Handmade
 0:01:17
How To Make Your Own DIY Plaster Hand Mold
 0:00:47
learning how to make hand pulled noodles #lanzhou #noodles #handpullednoodles #cooking
 0:00:48
I will make YOUR hand FREEZE!🥶❄️#magic#trythis
 0:00:35
How I Make The Hand Animation For My Custom Figures
 0:00:47
How To Make The CLASSIC Hand Fart Noise EASY
 0:00:16
DIY Handmade tissue hand soap/ DIY paper soap | how to make paper soap
 0:00:17
How to make Japanese hand paper fan | 🤩😊 Diy | #shorts #youtubeshorts #diy
 0:00:22
How to make a robotic hand form cardboard #cardboardcraft #diycrafts
 0:00:15
How To Make a Plastic Bottle Hand Fan !!! #shorts
Комментарии