filmov
tv
How to Remove and Clean Corrosion on a Dodge Ram TIPM
Показать описание
How to remove and clean the integrated power distribution fuse box module under the hood. Over time, being exposed to moisture and with age, the fuse box can develop corrosion which leads to many different electrical issues. After cleaning the TIPM, this solved my battery drain issue. #dodgeram #diy
Tools/Supplies Needed:
-10mm socket or wrench
-14mm socket or wrench
-ratchet
-small pry tool
-electronic cleaners and protectants
Procedure:
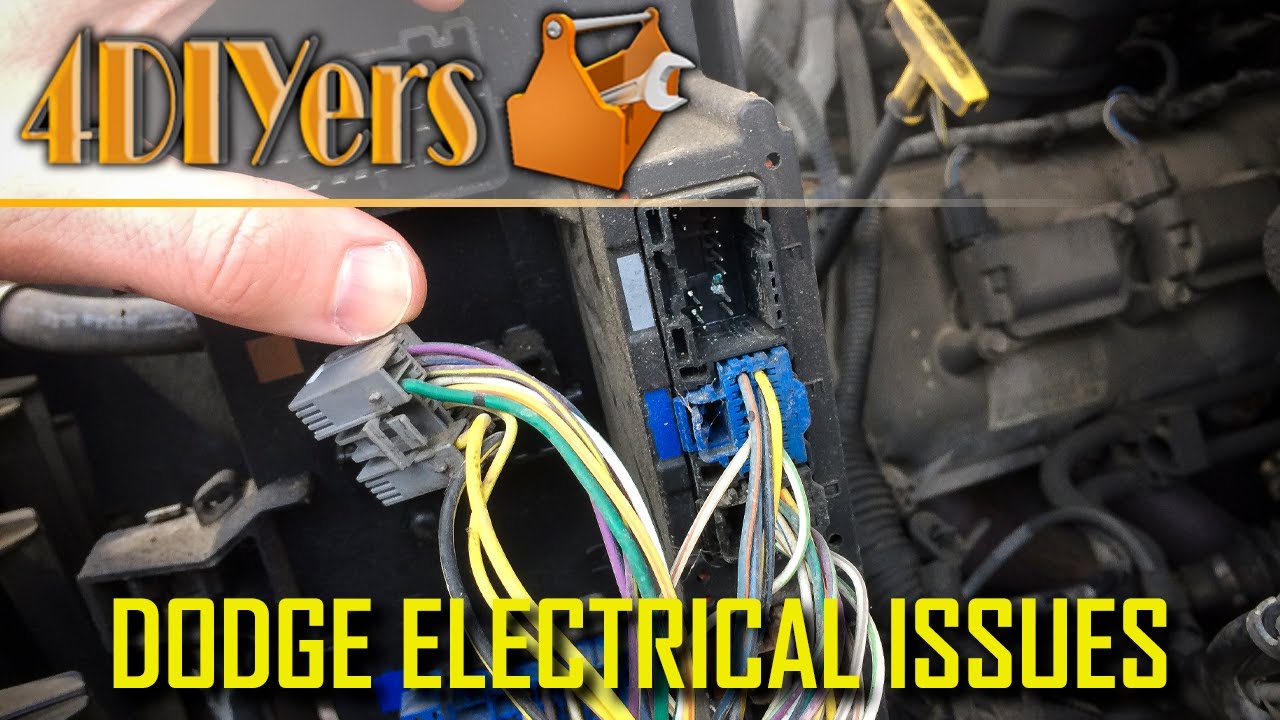
The first thing we need to do is disconnect the battery. Disconnecting the negative battery terminal is only required, use a 10mm wrench or socket and ratchet. Removing the main power supply on the outside of the fuse box. This is held on by a 14mm nut.
Flip up the fuse box, this is fairly easy to work with. Using a small pry tool, you’ll have two snap clips, one on each side. Use the pry tool to pull out the tabs, the fuse box has a hinge on the bottom, pull the top out towards the engine.
Using the small pry tool again, you’ll need to push the red flip forward and this will allow you to flip up the white levers to remove each of the electrical connectors. For the connectors on the side, there is a tab that needs to be depressed, then pulling the connection straight off. When done, then lift out the fuse box.
For opening up the fuse box. Removing all the fuses, pliers can be used, just make sure you don’t damage them. Remove the 5 T20 torx screws. Using a standard screwdriver, pry around the outer edge to disconnect the clips and help the inner cap out. Take your time, it can wedge preventing the opposite side from disconnecting. After that is removing the circuit board, using the standard screwdriver, pry up the main power supply terminal and then lift out the circuit board. You can also assist it out by pressing on the plug connections on the rear of the assembly.
Inspect for any corrosion, first is cleaning with a brush. For this I am using DeoxIT’s gold kit, it comes with the cleaning tools, corrosion remover, and protectant. First using the supplied round brush, clean the terminals of any debris.
On the terminals which are still enclosed with the plastic casing, use DeoxIt’s D5 spray. This will dissolve any corrosion, depending on the severity, you may need more than one application. The thinner solution allows for flushing action to get into those tight places.
As for the exposed terminals, back to the DeoxIT gold kit, using the D100L and the supplied brush, apply it to the rest of the terminals. Again if there is extreme corrosion, make one application, let it sit for some time, clean away the corrosion, and apply more as needed.
When everything is finalized, apply a layer of G100L to the terminals as a layer of protection. Mine was fairly clean, other than one broken terminal which I’ll show you in a moment. When done, wipe off the access solution using the clothes from the DeoxIt Gold Kit. Assemble in reverse of removal. Install the circuit board back in the bottom portion of the case. Take your time and make sure all those terminals are aligning with their holes.
Next is installing the cover, snap it back into place. Again make sure those terminals are aligning with their holes, do not bend or break any of them. Install the torx screws and tighten. Don’t overtighten them as this is only plastic. Finally reinstall the fuses. Their orientation doesn’t matter, however, make sure they are in their correction locations.
Going back over to the truck, spray each of the electrical connectors with DeoxIt’s D5 solution, this will flush out any dirt and corrosion. If corrosion is excessive, more than one application may be needed. Then allow it to sit for a couple of hours so the solution can dry.
Install the module in reverse of removal. While my main power terminal was clean, these can corrode too so I applied some of DeoxIt’s battery cleaner and protectant as preventative maintenance. Then install the terminal and tighten. Then reconnect the battery.
Thank you to all those who watch my videos and support my content. Don't forget to subscribe to my channel for future tutorial videos and like my video if you found it helpful. New videos are always being uploaded every week!
© 4DIYers 2013
All Rights Reserved
No part of this video or any of its contents may be reproduced, copied, modified or adapted, without the prior written consent of the author.
Tools/Supplies Needed:
-10mm socket or wrench
-14mm socket or wrench
-ratchet
-small pry tool
-electronic cleaners and protectants
Procedure:
The first thing we need to do is disconnect the battery. Disconnecting the negative battery terminal is only required, use a 10mm wrench or socket and ratchet. Removing the main power supply on the outside of the fuse box. This is held on by a 14mm nut.
Flip up the fuse box, this is fairly easy to work with. Using a small pry tool, you’ll have two snap clips, one on each side. Use the pry tool to pull out the tabs, the fuse box has a hinge on the bottom, pull the top out towards the engine.
Using the small pry tool again, you’ll need to push the red flip forward and this will allow you to flip up the white levers to remove each of the electrical connectors. For the connectors on the side, there is a tab that needs to be depressed, then pulling the connection straight off. When done, then lift out the fuse box.
For opening up the fuse box. Removing all the fuses, pliers can be used, just make sure you don’t damage them. Remove the 5 T20 torx screws. Using a standard screwdriver, pry around the outer edge to disconnect the clips and help the inner cap out. Take your time, it can wedge preventing the opposite side from disconnecting. After that is removing the circuit board, using the standard screwdriver, pry up the main power supply terminal and then lift out the circuit board. You can also assist it out by pressing on the plug connections on the rear of the assembly.
Inspect for any corrosion, first is cleaning with a brush. For this I am using DeoxIT’s gold kit, it comes with the cleaning tools, corrosion remover, and protectant. First using the supplied round brush, clean the terminals of any debris.
On the terminals which are still enclosed with the plastic casing, use DeoxIt’s D5 spray. This will dissolve any corrosion, depending on the severity, you may need more than one application. The thinner solution allows for flushing action to get into those tight places.
As for the exposed terminals, back to the DeoxIT gold kit, using the D100L and the supplied brush, apply it to the rest of the terminals. Again if there is extreme corrosion, make one application, let it sit for some time, clean away the corrosion, and apply more as needed.
When everything is finalized, apply a layer of G100L to the terminals as a layer of protection. Mine was fairly clean, other than one broken terminal which I’ll show you in a moment. When done, wipe off the access solution using the clothes from the DeoxIt Gold Kit. Assemble in reverse of removal. Install the circuit board back in the bottom portion of the case. Take your time and make sure all those terminals are aligning with their holes.
Next is installing the cover, snap it back into place. Again make sure those terminals are aligning with their holes, do not bend or break any of them. Install the torx screws and tighten. Don’t overtighten them as this is only plastic. Finally reinstall the fuses. Their orientation doesn’t matter, however, make sure they are in their correction locations.
Going back over to the truck, spray each of the electrical connectors with DeoxIt’s D5 solution, this will flush out any dirt and corrosion. If corrosion is excessive, more than one application may be needed. Then allow it to sit for a couple of hours so the solution can dry.
Install the module in reverse of removal. While my main power terminal was clean, these can corrode too so I applied some of DeoxIt’s battery cleaner and protectant as preventative maintenance. Then install the terminal and tighten. Then reconnect the battery.
Thank you to all those who watch my videos and support my content. Don't forget to subscribe to my channel for future tutorial videos and like my video if you found it helpful. New videos are always being uploaded every week!
© 4DIYers 2013
All Rights Reserved
No part of this video or any of its contents may be reproduced, copied, modified or adapted, without the prior written consent of the author.
 0:01:07
How to remove & clean the headband on the AirPods Max!
 0:18:26
How to Remove and Clean Sticky Keys on M1 Macbook Air Step by Step Repair (Very Detailed Fix)
 0:02:39
How to remove and clean your NEFF Slide&Hide® Oven door | NEFF UK
 0:03:49
How To Remove And Clean Mould From Silicone - Bunnings Warehouse
 0:05:50
How to Clean a Keyboard Properly (Remove the Keycaps)
 0:03:28
How to remove ear wax in home and clean safely
 0:04:42
How to remove and clean a faucet aerator - Kohler aerator removal
 0:04:34
How to Clean Glass Shower Doors and Remove Hard Water Stains!
 0:05:47
How to remove TINY BUMPS Naturally at home | Get rid of small bumps on Forehead & bumpy skin |
 0:15:28
How to Remove and Clean Furnace or AC Blower Wheel
 0:08:20
️🔥 How to Remove & Clean Harmful Mildew / Mold➔ from Bathroom Sink Faucet, Aerator, and Drain...
 0:01:05
How to Remove and Clean Frigidaire Dishwasher Filter
 0:04:31
How to remove & clean bathroom ceiling fan - Nutone
 0:01:39
HOW TO CLEAN WALLS / HOW TO REMOVE BAD SMELL IN THE HOUSE
 0:01:08
How to Remove and Clean GE Dishwasher Filter
 0:07:54
HOW TO REMOVE WINDOWS- Make 3-4 story windows easy to clean
 0:06:02
Easy! How To REMOVE & CLEAN Soap Scum From Tub 🛁
 0:07:18
How To Remove Tape, Clean & Wash Hair System | Non-Surgical Hair Replacement System Men/Women UK
 0:11:16
HOW TO REMOVE HARD WATER STAINS || CLEAN LIMESCALE OFF FIXTURES
 0:03:28
How to Remove and Clean the Filter on Your Miele TriFlex HX2 Vacuum
 0:11:47
HOW TO REMOVE GREASE FROM KITCHEN SURFACES | CLEAN WITH ME
 0:02:30
How to easily REMOVE, CLEAN AND RE-INSTALL your inside house windows like a pro
 0:29:34
How to Clean a Seal & Drum to Remove Mold & Smells From a Washing Machine, Guaranteed!!!
 0:03:46
How To Remove and Clean Sticky Plastic from Zoom Recorders
Комментарии