filmov
tv
How to Dynamically Disable a Button in Jupyter Widgets Based on Input Value

Показать описание
Discover how to enable or disable a button in Jupyter widgets based on text input. Learn with a step-by-step solution and example code!
---
Visit these links for original content and any more details, such as alternate solutions, latest updates/developments on topic, comments, revision history etc. For example, the original title of the Question was: Jupyter widgets: disable a button if input is empty else enable?
If anything seems off to you, please feel free to write me at vlogize [AT] gmail [DOT] com.
---
How to Dynamically Disable a Button in Jupyter Widgets Based on Input Value
When working with Jupyter widgets, a common requirement is to control the state of a button based on user input. Specifically, you might want to disable a button when the input field is empty, and enable it when there's text present. If you've ever encountered this challenge, you're not alone! In this guide, we'll go step by step through a solution that accomplishes exactly that.
The Challenge
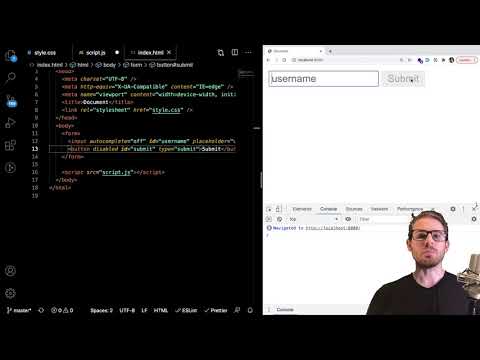
In a Jupyter Notebook, you may want to create a user interface where a button should only be active (enabled) if the user provides some input. For instance, consider a text input where a user types in their name before clicking a "Submit" button. It makes sense to disable the button until they've entered some text, preventing unintentional actions that could arise from a blank submission.
The question is: How can you implement this functionality using Jupyter widgets? Let's dive into the solution!
Step-by-Step Solution
Step 1: Import Necessary Libraries
First, ensure that you have the widgets library. If you're in a Jupyter notebook or JupyterLab environment, it should be available by default. If not, you can install it with pip:
[[See Video to Reveal this Text or Code Snippet]]
Step 2: Create the Input Widget
We will start with a text input widget. Here’s the basic setup:
[[See Video to Reveal this Text or Code Snippet]]
This sets up a text input widget which will initially be empty.
Step 3: Create the Button Widget
Next, create a button widget. Initially, we want this button to be disabled:
[[See Video to Reveal this Text or Code Snippet]]
The disabled=True ensures that the button is inactive when the page first loads.
Step 4: Define Interaction Logic
To change the button's state based on the input field's value, we need to define a function that will be triggered when the input changes. This function will check if the input is empty or not.
[[See Video to Reveal this Text or Code Snippet]]
Step 5: Observe Input Changes
Finally, we need to make sure the button responds to changes in the input field by using the observe() method:
[[See Video to Reveal this Text or Code Snippet]]
This means that every time the value of input changes, it will call the value_changed function, effectively enabling or disabling the button as required.
Complete Code Example
Combining all the pieces together, your final code will look like this:
[[See Video to Reveal this Text or Code Snippet]]
Conclusion
With this simple solution, you have now created an interactive user interface using Jupyter widgets that conditionally disables a button based on whether an input field is filled or empty. This not only improves usability but also makes your applications more robust. Try it out yourself and have fun building dynamic UIs in your Jupyter projects!
---
Visit these links for original content and any more details, such as alternate solutions, latest updates/developments on topic, comments, revision history etc. For example, the original title of the Question was: Jupyter widgets: disable a button if input is empty else enable?
If anything seems off to you, please feel free to write me at vlogize [AT] gmail [DOT] com.
---
How to Dynamically Disable a Button in Jupyter Widgets Based on Input Value
When working with Jupyter widgets, a common requirement is to control the state of a button based on user input. Specifically, you might want to disable a button when the input field is empty, and enable it when there's text present. If you've ever encountered this challenge, you're not alone! In this guide, we'll go step by step through a solution that accomplishes exactly that.
The Challenge
In a Jupyter Notebook, you may want to create a user interface where a button should only be active (enabled) if the user provides some input. For instance, consider a text input where a user types in their name before clicking a "Submit" button. It makes sense to disable the button until they've entered some text, preventing unintentional actions that could arise from a blank submission.
The question is: How can you implement this functionality using Jupyter widgets? Let's dive into the solution!
Step-by-Step Solution
Step 1: Import Necessary Libraries
First, ensure that you have the widgets library. If you're in a Jupyter notebook or JupyterLab environment, it should be available by default. If not, you can install it with pip:
[[See Video to Reveal this Text or Code Snippet]]
Step 2: Create the Input Widget
We will start with a text input widget. Here’s the basic setup:
[[See Video to Reveal this Text or Code Snippet]]
This sets up a text input widget which will initially be empty.
Step 3: Create the Button Widget
Next, create a button widget. Initially, we want this button to be disabled:
[[See Video to Reveal this Text or Code Snippet]]
The disabled=True ensures that the button is inactive when the page first loads.
Step 4: Define Interaction Logic
To change the button's state based on the input field's value, we need to define a function that will be triggered when the input changes. This function will check if the input is empty or not.
[[See Video to Reveal this Text or Code Snippet]]
Step 5: Observe Input Changes
Finally, we need to make sure the button responds to changes in the input field by using the observe() method:
[[See Video to Reveal this Text or Code Snippet]]
This means that every time the value of input changes, it will call the value_changed function, effectively enabling or disabling the button as required.
Complete Code Example
Combining all the pieces together, your final code will look like this:
[[See Video to Reveal this Text or Code Snippet]]
Conclusion
With this simple solution, you have now created an interactive user interface using Jupyter widgets that conditionally disables a button based on whether an input field is filled or empty. This not only improves usability but also makes your applications more robust. Try it out yourself and have fun building dynamic UIs in your Jupyter projects!
 0:05:17
 0:14:56
 0:08:44
 0:00:15
 0:01:45
 0:01:52
 0:00:23
 0:11:02
 0:00:49
 0:02:20
 0:02:07
 0:12:58
 0:01:16
 0:02:04
 0:02:14
 0:13:41
 0:00:50
 0:02:02
 0:01:03
 0:01:56
 0:01:49
 0:00:10
 0:01:33
 0:02:11