filmov
tv
How to DIY Lace Cuff Bracelet
Показать описание
As we all know, pearl beads are so elegant and pretty; and lace is favored by most of girls. The combination of pearls and lace is perfect for girls and would be loved by all ladies.
How to DIY lace cuff bracelet? Let’s follow the tutorial to learn how:
This is what you need:
Craft Adhesive
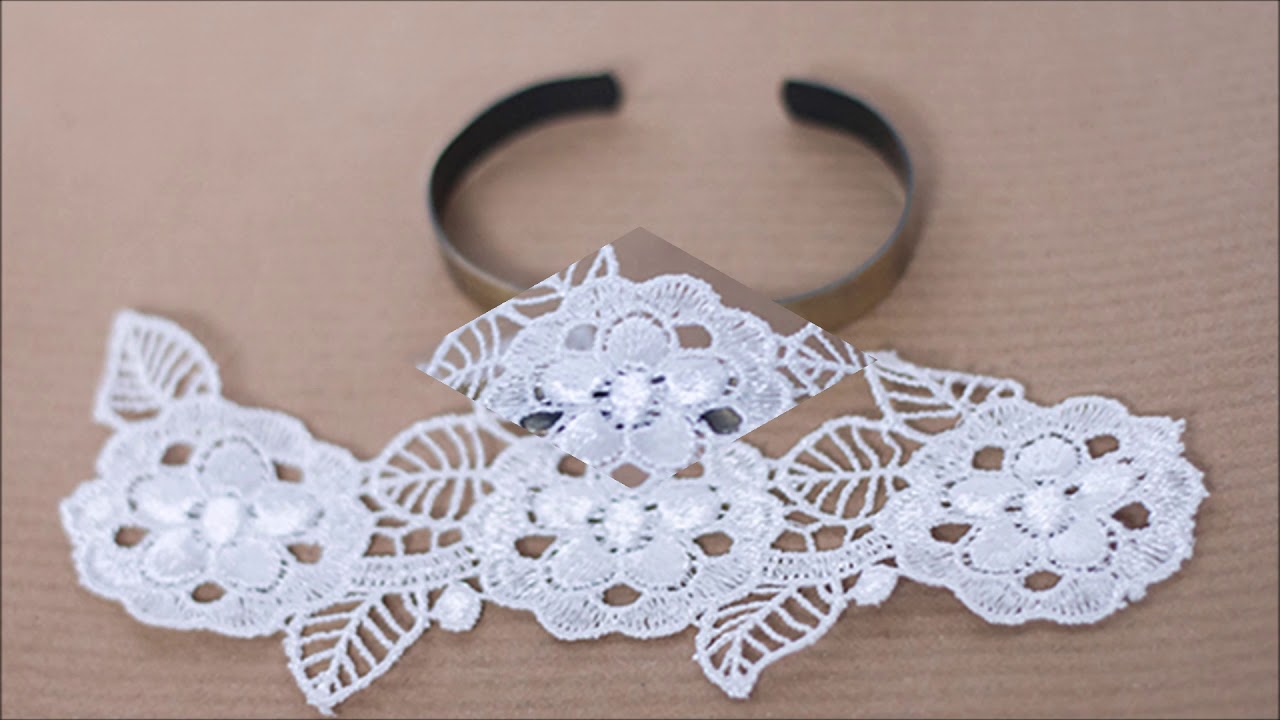
Floral venice lace
Cutting pliers
Brass bracelet cuff
Flat back rhinestones
Pearl beads
STEP 1
Remove the stone tray in the center of the cuff with cutting pliers. It takes a little yanking, but it should come off just fine.
STEP 2
Cut a piece of venice lace long enough to cover the cuff. The good thing about venice lace is that you can always cut the ends so that it looks like it was that long in the first place.
Apply glue to the outside of the bracelet cuff and carefully place the lace on top of it, making sure that it’s centered both horizontally and vertically.
STEP 3
Starting from the center, start glueing rhinestones and pearls onto the lace. I noticed that since the E6000 doesn’t dry instantly, that some of the pearls (which are heavier) started to fall off as I turned the cuff and gravitation kicked in. So, I glued about 2-3 cm of lace at a time, full of pearls and rhinestone, alternating randomly between the two. Then used my blow-drier to dry the glue, and moved on to the next part.
After you’re finished gluing and blow-drying, let the cuff dry for another few hours just to make sure. And you’re done!
This cuff came together very quickly, and looks rather stunning in person.
How to DIY lace cuff bracelet? Let’s follow the tutorial to learn how:
This is what you need:
Craft Adhesive
Floral venice lace
Cutting pliers
Brass bracelet cuff
Flat back rhinestones
Pearl beads
STEP 1
Remove the stone tray in the center of the cuff with cutting pliers. It takes a little yanking, but it should come off just fine.
STEP 2
Cut a piece of venice lace long enough to cover the cuff. The good thing about venice lace is that you can always cut the ends so that it looks like it was that long in the first place.
Apply glue to the outside of the bracelet cuff and carefully place the lace on top of it, making sure that it’s centered both horizontally and vertically.
STEP 3
Starting from the center, start glueing rhinestones and pearls onto the lace. I noticed that since the E6000 doesn’t dry instantly, that some of the pearls (which are heavier) started to fall off as I turned the cuff and gravitation kicked in. So, I glued about 2-3 cm of lace at a time, full of pearls and rhinestone, alternating randomly between the two. Then used my blow-drier to dry the glue, and moved on to the next part.
After you’re finished gluing and blow-drying, let the cuff dry for another few hours just to make sure. And you’re done!
This cuff came together very quickly, and looks rather stunning in person.
 0:00:23
 0:00:14
 0:00:10
 0:04:19
 0:00:26
 0:00:20
 0:00:16
 0:01:00
 0:00:57
 0:11:43
 0:00:58
 0:03:25
 0:08:21
 0:01:00
 0:02:22
 0:00:58
 0:08:50
 0:01:28
 0:00:54
 0:00:16
 0:02:33
 0:00:16
 0:04:01
 0:09:57