filmov
tv
[Text&Video] How to Model a Minecraft block in 3DS Max
Показать описание
Okay, here I go.
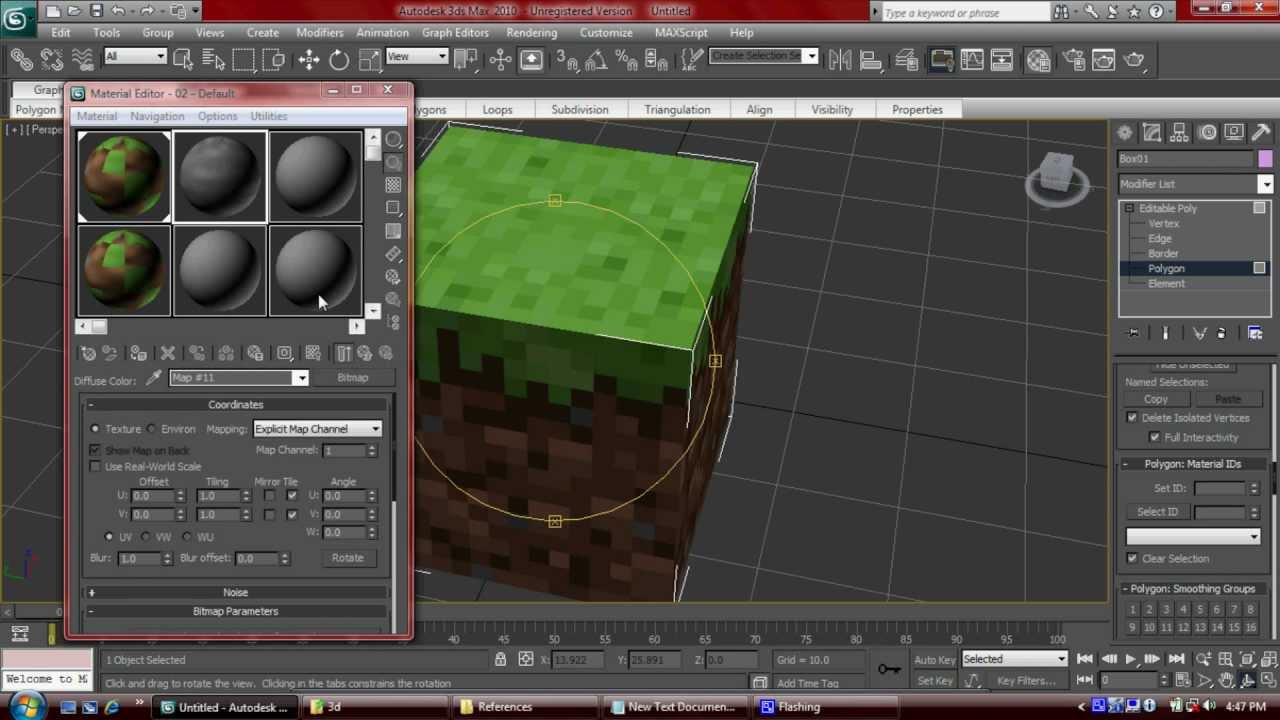
Third, Open 3dsmax and create a box that is 50 on length, width, and height. If you think its to big, scale it later or just use 25. Next, I want you to right click - Convert to: - Convert to Editable Poly. After that, I would like you to go to the modify tab. Press the "+" Next to Editable Poly, then click on Polygon.
Scroll down in the roll out till you find "Polygon material IDs" . From there, I need you to click on the top polygon. (Make sure it's only the top or you will have to top texture on the side or something.)
Give the top polygon an ID of 1.
Give the side polygon an ID of 2
Then give the bottom polygon an ID of 3
Go to the your material editor by pressing M, choose a blank material, click on standard and choose Multi/Sub-Object. Delete the old material if it gives you the message. Next, I would need you to Set the number from 10 to 3. Then under, where it says Sub-Material. Click on the one that Corresponds to ID 1. Then, I would like you to go where it says "Diffuse:" Click on the tiny box. After that, choose bitmap and find the top texture. If you would like to see the texture in your viewport toggle the "Show Standard Map in viewport" (This has to be done EVERY TIME you are adding a bitmap to the material). Once you finish that, right next to standard is a drop down menu and I would like for you to select the one which is named "01 - default" or something similar.
Repeat the process for each material ID.
Once you final completed the material, drag it on to your box. Press F9. You have successfully made a a Minecraft block.
To connect the blocks together and clone them, just find you snaps toggle tool and right click. Check the vertex box and close Grid and Snap Settings menu. Then to clone or place a block next to the other. Just simply, find the corner opposite you want to move it to and hold shift, click and move.
Programs Used:
Photoshop CS3
3DS Max 10 - Student Version
The easy way to fix the blurry textures in render, is opening Render set up (F10) click the "Render" tap, under "Antialiasing" uncheck the "Filter Maps" This wil fix the blurry texture in the render, but not in viewport. Hope this helps :)
Thank you for your time, please leave a like and subscribe for more videos. ^_^
►Social Media◄
● Facebook: N/A
════════════════════
════════════════════
 0:14:06
Text-to-Video Generation using a Generative AI Model
 0:06:56
Easy Text-to-Video in Python | Python Tutorial with Damo-vilab Model
 0:00:18
OpenAI Sora - Text to Video Model tokyo in the snow
 0:14:48
Mora: BEST Sora Alternative - Text-To-Video AI Model!
 0:00:09
OpenAI Sora - Text to Video Model cat on bed
 0:10:24
Introducing Sora — OpenAI’s text-to-video model
 0:01:23
Google DeepMind's text-to-video model Veo creates 60 second video
 0:00:59
DiffusionRet: Generative Text-Video Retrieval with Diffusion Model
 1:50:56
AI TUTORIAL 5 - Text to Video
 0:00:18
The best text to video AI model is here! Runway Gen 3
 0:03:18
MiniMax : Text to Video generation model
 0:16:29
NEW Reka Core SOTA Model Does Text, Audio, Video, and more!
 0:02:51
MiniMax : The best text to video generation free model
 0:00:19
OpenAI's new text-to-video GenAI model Sora | TechCrunch
 0:10:17
Open-Sora: Opensource Sora Alternative - Text-To-Video AI Model!
 0:00:38
Turn Your Text Into a 3D Model with Bezi.ai #ai #aitools #3d #model #askai
 0:00:39
OpenAI SORA: The FUTURE of AI (BEST Text-To-Video Model) | Ishan Sharma
 0:29:10
Text to Video Generation using Videocrafter: Intuitive Math behind Latent Diffusion Model
 0:09:18
AI Video's Newest Next Gen Model Just Arrived!
 0:19:44
Metas 'MovieGen' AI Just SHOCKED The AI World (Text To Video AI)
 0:00:20
OpenAI Sora - Text to Video Model snow dogs
 0:10:56
Leonardo AI Huge Update - Phoenix: New Text to Image AI Model for 3D, Portrait, and Cinematic Art
 0:02:01
VEO - text-to-video generation model (Google DeepMind) - samples with prompts
 0:07:37
Make Money with Sora: OpenAI's Text-to-Video Model
Комментарии