filmov
tv
Understanding the switch-case Structure: Handling Multiple Conditions Efficiently in Arduino

Показать описание
Learn how to efficiently handle multiple conditions in Arduino using the switch-case structure. Explore the syntax, advantages, and best practices for implementing switch-case statements in your Arduino projects.
---
Disclaimer/Disclosure: Some of the content was synthetically produced using various Generative AI (artificial intelligence) tools; so, there may be inaccuracies or misleading information present in the video. Please consider this before relying on the content to make any decisions or take any actions etc. If you still have any concerns, please feel free to write them in a comment. Thank you.
---
When working on Arduino projects, efficient handling of multiple conditions is crucial for writing clean and organized code. One of the most effective ways to manage multiple conditions in Arduino sketches is by using the switch-case structure. In this article, we'll delve into the syntax, advantages, and best practices for implementing switch-case statements in Arduino.
Understanding the switch-case Structure
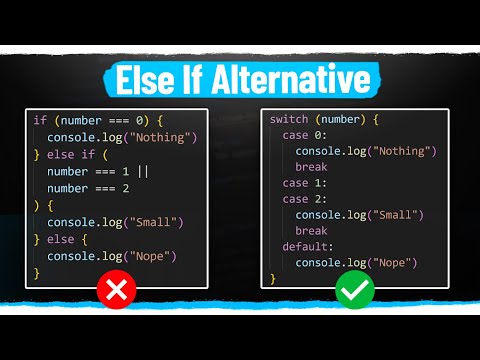
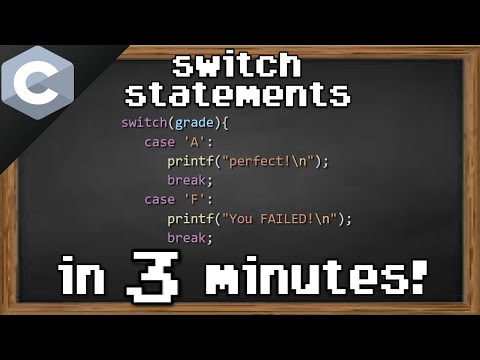
The switch-case structure provides a convenient way to execute different blocks of code based on the value of a variable or expression. It is particularly useful when dealing with multiple conditions that each require a different action to be taken. Here's a basic syntax of a switch-case statement in Arduino:
[[See Video to Reveal this Text or Code Snippet]]
Advantages of Using switch-case
Readability: Switch-case statements make code more readable and maintainable, especially when dealing with multiple conditions. Each case represents a specific condition, improving the clarity of the code.
Efficiency: Compared to using multiple if-else statements, switch-case can be more efficient, especially when there are many conditions to evaluate. It can result in faster execution and reduced memory usage.
Scalability: As your project grows and you need to add more conditions, the switch-case structure scales well and remains easy to manage.
Best Practices for Using switch-case
Use with Enumerations: For improved readability and type safety, consider using enumerations (enums) as the switch variable. Enums provide descriptive names for states or options, making the code more self-explanatory.
Avoid Floating-point Numbers: While switch-case statements work with integer types, using floating-point numbers can lead to unexpected behavior due to precision issues. If necessary, convert floating-point numbers to integers before using them in switch-case statements.
Include a Default Case: Always include a default case in your switch-case statements to handle unexpected values or edge cases. This ensures that your code behaves predictably even when the switch variable does not match any of the specified cases.
Example Usage
Let's consider a simple example where we use a switch-case statement to control an LED based on different input conditions:
[[See Video to Reveal this Text or Code Snippet]]
In this example, the LED's state is controlled based on different sensor readings.
Conclusion
The switch-case structure is a powerful tool for efficiently handling multiple conditions in Arduino sketches. By following best practices and understanding its advantages, you can write cleaner and more maintainable code for your Arduino projects.
Remember to leverage the switch-case structure alongside other programming constructs to create robust and functional Arduino applications.
---
Disclaimer/Disclosure: Some of the content was synthetically produced using various Generative AI (artificial intelligence) tools; so, there may be inaccuracies or misleading information present in the video. Please consider this before relying on the content to make any decisions or take any actions etc. If you still have any concerns, please feel free to write them in a comment. Thank you.
---
When working on Arduino projects, efficient handling of multiple conditions is crucial for writing clean and organized code. One of the most effective ways to manage multiple conditions in Arduino sketches is by using the switch-case structure. In this article, we'll delve into the syntax, advantages, and best practices for implementing switch-case statements in Arduino.
Understanding the switch-case Structure
The switch-case structure provides a convenient way to execute different blocks of code based on the value of a variable or expression. It is particularly useful when dealing with multiple conditions that each require a different action to be taken. Here's a basic syntax of a switch-case statement in Arduino:
[[See Video to Reveal this Text or Code Snippet]]
Advantages of Using switch-case
Readability: Switch-case statements make code more readable and maintainable, especially when dealing with multiple conditions. Each case represents a specific condition, improving the clarity of the code.
Efficiency: Compared to using multiple if-else statements, switch-case can be more efficient, especially when there are many conditions to evaluate. It can result in faster execution and reduced memory usage.
Scalability: As your project grows and you need to add more conditions, the switch-case structure scales well and remains easy to manage.
Best Practices for Using switch-case
Use with Enumerations: For improved readability and type safety, consider using enumerations (enums) as the switch variable. Enums provide descriptive names for states or options, making the code more self-explanatory.
Avoid Floating-point Numbers: While switch-case statements work with integer types, using floating-point numbers can lead to unexpected behavior due to precision issues. If necessary, convert floating-point numbers to integers before using them in switch-case statements.
Include a Default Case: Always include a default case in your switch-case statements to handle unexpected values or edge cases. This ensures that your code behaves predictably even when the switch variable does not match any of the specified cases.
Example Usage
Let's consider a simple example where we use a switch-case statement to control an LED based on different input conditions:
[[See Video to Reveal this Text or Code Snippet]]
In this example, the LED's state is controlled based on different sensor readings.
Conclusion
The switch-case structure is a powerful tool for efficiently handling multiple conditions in Arduino sketches. By following best practices and understanding its advantages, you can write cleaner and more maintainable code for your Arduino projects.
Remember to leverage the switch-case structure alongside other programming constructs to create robust and functional Arduino applications.
 0:06:57
 0:03:40
 0:05:26
 0:09:50
 0:04:42
 0:07:24
 0:01:56
 0:04:45
 0:09:31
 0:01:47
 0:15:30
 0:08:02
 0:06:38
 0:16:13
 0:05:49
 0:06:58
 0:05:55
 0:22:18
 0:00:38
 0:15:36
 0:11:10
 0:22:48
 0:01:32
 0:12:44