filmov
tv
How to Repair Wobbly Chairs Properly - Furniture Restoration Techniques

Показать описание
See how to repair a wobbly chair in our furniture repair shop. This is a common repair that homeowners can do if they follow the right steps. If you don't do it right, your repair will fail, or worse, you can damage the chair.
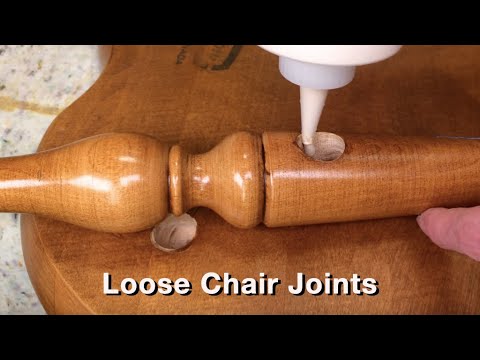
The first step is to take the chair apart. If you squeeze glue in a loose joint, it won't hold. Label all the parts with masking tape so you know how it goes together again. I take chairs apart with spreader clamps (see link below) to gently separate the parts. If you use something like a rubber mallet, there's a risk you could break a part.
The next step is to clean the glue off the joints where the parts connect. Standard wood glue (PVA) won't stick to the old glue so it needs to be removed for the glue to work properly. Sandpaper is the best DIY way to remove the old glue off the tenons (the parts that go into the holes). It can also be used in the mortises (holes) to gently remove any old glue. I prefer to use drill bits to remove the old glue.
To glue up the chair, make sure all the parts are set out in the right order to go together and have your clamps ready. If you're new to this, you should practice the clamping of the chair so you're confident your clamps will work on the parts you want to clamp. Also, have something heavy (50+ pounds) ready to place on the seat. You need to work on a level surface to ensure the chair won't wobble after the glue dries.
When you're ready, apply the glue with an artist brush - use the back end for coating the inside side of the mortises (holes) and use the brush end to apply it to the tenons. One common mistake people make when using wood glue, is not spreading it on all the surface of both sides of the chair joint. Don’t spread the glue with your finger because the oils from your skin can weaken the glue. Assemble the chair quickly as you typically have 15 minutes before the glue starts to set up. Stand the chair up and add weight on top of the seat to ensure all 4 legs are touching the ground. Add clamps to all the parts that were glued - this is important as standard wood glue won't work unless pressure is applied to the glued parts.
If you don’t do this the right way, your repair won’t stand up to the abuse the chair joints get. I hope this helps you understand how to successfully repair loose chairs. Here are tools and materials to help you with your project:
Note: purchases made with these links support the video production work of the Fixing Furniture YouTube channel.
VIDEO TOPICS:
00:00 How to Repair Wobbly Chairs Properly
01:41 Take the chair apart
02:52 Clean glue off the joints
04:12 Property apply glue
07:12 Apply clamping pressure
#ChairRepair #Woodworking #Repair
 0:08:26
How to Repair Wobbly Chairs Properly - Furniture Restoration Techniques
 0:20:28
How To Repair And Re-glue Loose Wooden Chairs Yourself - The Right Way.
 0:14:40
How to Repair Wooden Chair Joints - Level 1 Woodworking Repair - Furniture Restoration
 0:08:56
How to Repair or Fix Wobbly Chair Legs - No Fuss! No disassembly!
 0:20:32
How to Repair Loose Chairs | Wood Furniture Restoration
 0:36:27
HOW TO REPAIR LOOSE JOINTS on a wobbly chair
 0:04:56
Give me 5 minutes and I’ll show you how to fix a Wobbly Chair!
 0:06:30
How to Fix your Wobbly Wooden Chair | DIY
 0:02:26
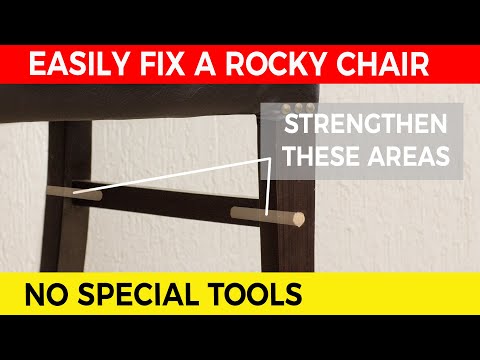
How to Reinforce Dining Room Chair Legs 🪑
 0:05:26
Fixing a Wobbly Chair with Luke | Furniture Repair Tips at The Bower Woodworks
 0:05:02
How to Fix a Loose Chair Rung
 0:02:08
How to Fix Wobbly Chair Legs and Furniture Legs
 0:05:41
How to Repair Loose Dining Room Chair Legs
 0:10:38
Repair those loose dining chairs yourself and save money. Do you know what to do?
 0:01:01
Fixing A Wobbly Chair Leg - WOOD magazine
 0:11:55
How to Repair a Wobbly Chair
 0:14:38
How To Fix A Wobbly Chair Or Table - Two Easy DIY Methods
 0:15:11
How To Fix Broken Wobbly Dining Table Chair with Loose & Missing Parts
 0:03:49
Wobbly furniture fix
 0:14:59
DIY: How to fix or repair that wobbly wooden chair!
 0:16:58
Bad Furniture Repair and How to Fix It - Woodworking Restoration
 0:03:38
How to strengthen wooden joints of furniture at home - Repair Kopitiam
 0:03:41
Leveling Chair Legs
 0:03:59
TIGHTENING CHAIRS WITH LAG BOLTS?! ...HUGH??
Комментарии