filmov
tv
Handling Exception in Spring Boot: Custom Error Responses Made Easy

Показать описание
Learn how to effectively handle exceptions in your Spring Boot application to return custom error messages instead of default errors.
---
Visit these links for original content and any more details, such as alternate solutions, latest updates/developments on topic, comments, revision history etc. For example, the original title of the Question was: Problem handling Exception with Spring boot
If anything seems off to you, please feel free to write me at vlogize [AT] gmail [DOT] com.
---
Handling Exception in Spring Boot: Custom Error Responses Made Easy
Spring Boot has revolutionized Java development, especially for building REST APIs. However, if you're new to this framework, you may encounter challenges, particularly when it comes to handling exceptions. If you've ever tried to create a simple REST API and faced issues with displaying the right error messages, you're not alone. In this guide, we will help you understand how to effectively handle exceptions in your Spring Boot application and provide meaningful feedback to users.
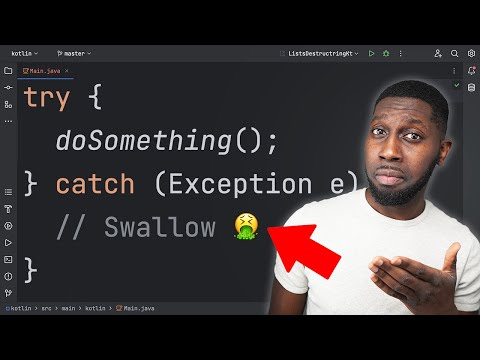
The Problem: Default Error Messages
When developing a REST API, you rely heavily on clear communication with the clients of the API. This means that the way you handle errors is just as important as the core functionality of your endpoints. Let’s take a look at a common scenario:
Scenario: You created a simple REST API with CRUD operations.
Issue: When you try to access a user that does not exist, instead of receiving a custom error message, you get the default Internal Server Error (HTTP 500) response.
For instance, when hitting the endpoint localhost:8080/userino/3 with a user ID that doesn’t exist, you see this error response:
[[See Video to Reveal this Text or Code Snippet]]
Clearly, this isn’t user-friendly and does not provide the specific information needed to understand what went wrong.
The Solution: Custom Exception Handling
Step 1: Define Your Exception
Firstly, ensure you have a custom exception that signifies a user not found scenario. For example, let's have a NotFoundException class.
[[See Video to Reveal this Text or Code Snippet]]
Step 2: Create a Global Exception Handler
Here’s where the magic happens! To customize the error messages, you need to set up an exception handler within your controller or a dedicated handler class. For instance, modify your code as follows:
[[See Video to Reveal this Text or Code Snippet]]
Step 3: Update Your Controller
Here’s how the complete controller method looks including the exception handling:
[[See Video to Reveal this Text or Code Snippet]]
Step 4: Defining the Response Structure
Make sure that the Response class has the necessary fields to return meaningful details back to the client. For instance, you may want it to include details like:
Message
Timestamp
Additional error data (if applicable)
[[See Video to Reveal this Text or Code Snippet]]
Conclusion
By following these steps, you can now return customized error messages in your Spring Boot application when an exception occurs. This not only enhances the user experience but also allows for better understanding of issues when using the API. Remember, providing meaningful error messages is crucial for debugging and improving your web services.
So next time you encounter an exception, don’t get stuck with default error messages; implement handling that showcases the issue clearly!
Thank you for reading, and happy coding with Spring Boot!
---
Visit these links for original content and any more details, such as alternate solutions, latest updates/developments on topic, comments, revision history etc. For example, the original title of the Question was: Problem handling Exception with Spring boot
If anything seems off to you, please feel free to write me at vlogize [AT] gmail [DOT] com.
---
Handling Exception in Spring Boot: Custom Error Responses Made Easy
Spring Boot has revolutionized Java development, especially for building REST APIs. However, if you're new to this framework, you may encounter challenges, particularly when it comes to handling exceptions. If you've ever tried to create a simple REST API and faced issues with displaying the right error messages, you're not alone. In this guide, we will help you understand how to effectively handle exceptions in your Spring Boot application and provide meaningful feedback to users.
The Problem: Default Error Messages
When developing a REST API, you rely heavily on clear communication with the clients of the API. This means that the way you handle errors is just as important as the core functionality of your endpoints. Let’s take a look at a common scenario:
Scenario: You created a simple REST API with CRUD operations.
Issue: When you try to access a user that does not exist, instead of receiving a custom error message, you get the default Internal Server Error (HTTP 500) response.
For instance, when hitting the endpoint localhost:8080/userino/3 with a user ID that doesn’t exist, you see this error response:
[[See Video to Reveal this Text or Code Snippet]]
Clearly, this isn’t user-friendly and does not provide the specific information needed to understand what went wrong.
The Solution: Custom Exception Handling
Step 1: Define Your Exception
Firstly, ensure you have a custom exception that signifies a user not found scenario. For example, let's have a NotFoundException class.
[[See Video to Reveal this Text or Code Snippet]]
Step 2: Create a Global Exception Handler
Here’s where the magic happens! To customize the error messages, you need to set up an exception handler within your controller or a dedicated handler class. For instance, modify your code as follows:
[[See Video to Reveal this Text or Code Snippet]]
Step 3: Update Your Controller
Here’s how the complete controller method looks including the exception handling:
[[See Video to Reveal this Text or Code Snippet]]
Step 4: Defining the Response Structure
Make sure that the Response class has the necessary fields to return meaningful details back to the client. For instance, you may want it to include details like:
Message
Timestamp
Additional error data (if applicable)
[[See Video to Reveal this Text or Code Snippet]]
Conclusion
By following these steps, you can now return customized error messages in your Spring Boot application when an exception occurs. This not only enhances the user experience but also allows for better understanding of issues when using the API. Remember, providing meaningful error messages is crucial for debugging and improving your web services.
So next time you encounter an exception, don’t get stuck with default error messages; implement handling that showcases the issue clearly!
Thank you for reading, and happy coding with Spring Boot!
 0:14:11
 0:28:05
 0:06:20
 0:28:05
 0:03:01
 0:15:49
 0:56:24
 0:38:06
 1:09:43
 0:30:41
 0:24:13
 0:15:29
 0:08:13
 0:14:29
 0:09:40
 0:09:49
 0:04:38
 0:11:12
 0:45:02
 0:24:59
 0:07:06
 0:13:56
 0:01:00
 0:13:25