filmov
tv
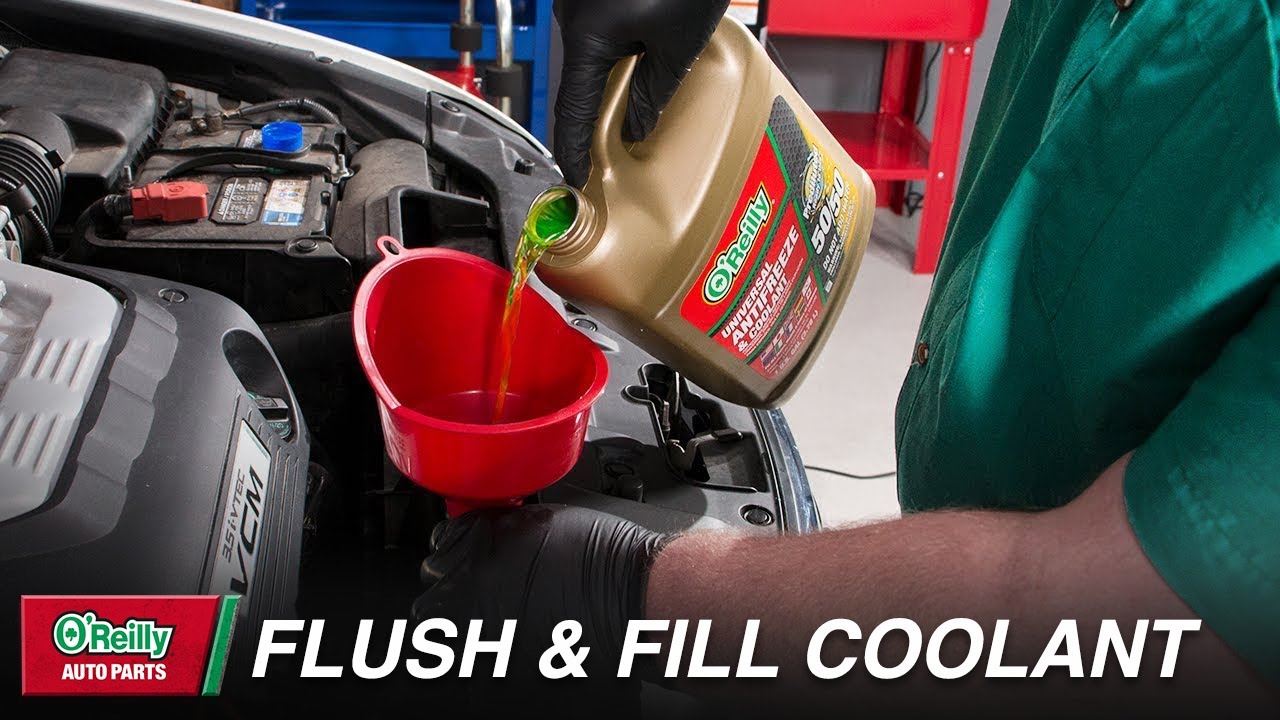
How To: Check, Flush & Fill Your Vehicle's Coolant
Показать описание
Flushing and filling your antifreeze (coolant) is typically recommended every five years, but your vehicle manufacturer will have a specific recommendation for your vehicle. Watch as we show you how to tackle this DIY maintenance on your vehicle.
0:00 Welcome Back
0:44 Check Your Anti-Freeze Level
1:02 Allow Coolant to Cool
1:12 Jack Up the Front
1:20 Drain the Coolant
2:08 Add Radiator Cleaner
2:28 Re-drain the Cooling System
2:40 Fill the System With Water
3:23 Refill the System With Coolant
3:40 Turn On Your Engine
3:49 Check Your Coolant Level
#OReillyPowered #CarRepair
#CarMaintenance #TeamOReilly
Transcript:
As with any do-it-yourself maintenance, it’s important to know the manufacturer’s specifications for your vehicle, including the type of antifreeze and coolant-to-water ratio that’s recommended, as well as how often to flush your system. If you’re not completely comfortable doing it yourself, stop by and we’d be happy to recommend a professional technician in your area.
So let’s take a look.
[Hood open]
• Antifreeze is toxic, so make sure you put on your gloves and eye protection.
• To check your antifreeze level, you’ll need to find your reservoir. In this case, it’s right here. Make sure the coolant is somewhere between the min and max marks.
• If you plan to flush the system, the fluid level isn’t as crucial, as long as it’s not so low that you think there could be a leak. You’ll be refilling it after the flush.
• If you’ve driven your vehicle recently, the coolant could be hot enough to cause injury, so wait till it’s cool to start the process.
• Jacking up the front of your vehicle and putting it on jack stands will make it easier to work underneath the radiator—but if you have a vehicle with plenty of ground clearance, it may not be necessary.
• To drain your old coolant, start by removing your fill cap—it can be on the radiator, the engine, the pressure tank or one of your hoses.
• Locate the petcock, which will be located on the bottom of one of the radiator tanks. It’s possible that it could have a small plastic cover that can be removed with a screwdriver.
• Place a drain pan under the radiator and loosen the petcock to let the old coolant run out. In some cases, this will be a hose that you’ll detach to let the old fluid drain.
• Once the coolant is done draining, re-tighten the petcock.
• Used antifreeze, motor oil and other automotive fluids are toxic and harmful to the environment and people. Used antifreeze is considered hazardous waste, so we can’t recycle it in our stores. Most communities have hazardous waste collection sites, so we suggest visiting your city or county website for details.
• Next, add radiator cleaner and water to manufacturer’s recommendations, and replace the cap.
• Start your engine, and turn your heater on high until the temperature gauge reads normal.
• Shut your engine off and let it cool down completely.
• Remove the fill cap and drain the system again. When it’s done draining, be sure to tighten the petcock.
• Use a garden hose to fill the system with water to manufacturer’s specifications, and replace the cap.
• Turn on the engine and let it run until the temperature gauge reads normal.
• Turn off the engine and let it cool down completely.
• Open the petcock and drain the system again, making sure to tighten it back when it’s done draining.
• Repeat the water flush process. You can use distilled water this time if you’re concerned about any remaining minerals from the tap water.
• Drain the water from the system, and make sure you retighten the petcock.
• Determine the coolant-to-water ratio and quantity specified by the vehicle manufacturer, and refill the system.
• When applicable, add coolant mixture to your recovery reservoir.
• Turn on your engine and let it run until the temperature gauge reads normal, and check under the vehicle for leaks.
• Shut off the engine, and once it’s cooled down completely, double-check the coolant level to see if any needs to be added. If it’s at the proper level, you’re all done.
 0:02:57
The Correct Way to Flush Your Engine - Leaves No Residue
 0:06:50
How to Quick Flush Your Cars Cooling System
 0:22:07
How to SUPER FLUSH your Cars Cooling System
 0:03:21
#flush #test.#zeroing of#arterial line. know how to do# zeroing and flush test in the arterial line
 0:05:27
IV Flush: How to Flush an IV Line (Cannula, Catheter) Saline Lock Nursing Skill
 0:04:42
Liqui moly engine flush big mistake or myth?
 0:02:09
Correct Way to FLUSH WATER HEATER! 2-Minute Tutorial
 0:02:21
Before and After Engine Flush with Liqui Moly Engine Flush Plus / Engine Sludge Build Up Removal
 0:11:52
Flushing a Torque Converter: Poor Man’s Method
 0:07:00
Signs You Need for Coolant Flush & How to Do a Coolant Flush
 0:03:25
how to replace a dual flush valve #toto #toiletrepair #plumbing
 0:22:36
The Truth About Engine Flush...DONT DO IT! #oilchange #engineflush #dieselengine
 0:02:12
How to Inspect Flush and Gap with PolyWorks
 0:02:37
Save money! How to change Geberit flush valve of a wall-hung wc #diyplumbing
 0:01:38
TOILET HAS WEAK FLUSH? EASY FIX!!! 2024 UPDATE EASY FIX!!! 🚽 👍😎
 0:03:15
How To Flush And Service Your Motorcycle's Radiator And Cooling System | MC GARAGE
 0:04:20
10,000 Orbeez! Will they flush? TOTO drake, WaterRidge, and VHP toilets #orbeez #flush #toilet
 0:03:30
CORRECT Way to Flush Waverunner After Riding In Saltwater
 0:06:33
Liqui Moly Sludge Remover vs Liqui Moly Engine Flush (Which is Best?)
 0:07:27
Flush Condition in Automotive | Under Flush | Over Flush and no Flush condition | Plastic Trim
 0:06:47
Should You Flush Your Engine?
 0:01:38
How To Fix The Push Button Cistern Toilet Flush No Tools Required - Easy And Fast
 0:02:45
How Can I Get My Toilet To Flush Stronger
 0:04:20
flush tank water not filling | toilet tank water fills slowly
Комментарии