filmov
tv
Van Electrical System Updates - Battery monitor w/shunt, new charge controller, Bluetooth and more.

Показать описание
Welcome to my channel all about my very small camper van - a diy minivan camper.
Please take a moment to subscribe:
It’s winter here, so it is a perfect time for some upgrades on my very small camper van.
I’m making a new center console to fit between the front seats of the van and making some changes to the 12 volt electrical system of the minivan camper.
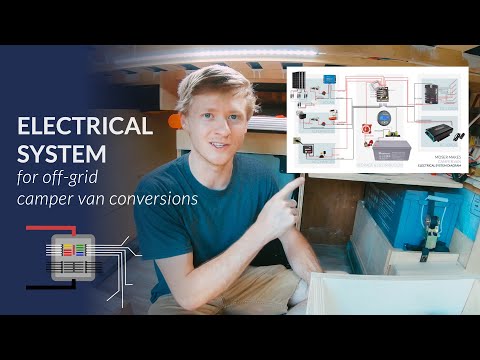
I’m installing an AiLi battery monitor with a shunt, a new Renogy Wanderer charge controller with a Bluetooth module to use with their BT app, a temperature sensor, USB charging ports, 12 volt sockets and a socket to plug in a genius charger, which I use as “shore power”.
All of this works with my Renogy solar panels - 100 watts on the roof of the van and a 50 watt portable panel that plugs in via as SAE socket - and a 90 amp hour AGM deep cycle battery.
I’ll also show you how to crimp copper lugs onto 4 AWG wires without a crimper. (hint: use a vise and a ball bearing)
I’ll also go over the whole electrical set up, with diagrams, wire and fuse sizes, and show how set the parameters on the battery monitor.
Here are some of the components I used. I don’t have any affiliations or sponsorships:
BATTERY
-Battery: 90 amp hour AGM from a local company, cheap one.
SOLAR IN
- 10 gauge wire with inline fuses between the panels and charge controller: max amps x 1.25 safety factor, then round up: in my case 10 amps for solar side and 30 amps for charge controller towards battery side. (match to amp rating of charge controller)
BATTERY ISOLATOR IN
This is to charge house battery while car is running. A BETTER OPTION is a DC to DC charger. But they were too expensive/not talked about when I was building mine. Some are both solar charge controllers and DC chargers and will also allow you to charge the vehicle battery from your solar...
AC CHARGING IN (shore power, sorta)
FUSE BOX OUT
The wiring I used is all 12 gauge but that is over kill for the watts my system is drawing.
It all goes to some lights, USB sockets for phone charging and fans, and some 12 volt sockets for cooler and inverter.
I will go over these in a futur video, in the spring when I have it all set up again and can film it.
INVERTER
I have an ancient 150 watt inverter, bought, literally, over 20 years ago for playing movies on laptop for kids on long drives. It just plugs in to the 12 V socket, same as it would in a car. It is fine for me as we don't run any AC appliances in the van.
We occasionally use it to charge the laptop, but will be switching over to a DC travel charger soon.
If you have more specific questions, give me a shout and I'll be happy to answer.
Bear in mind: I am not an electrician, just some other fool with a youtube channel, who has done a bit of research for her own system. :-)
Please take a moment to subscribe:
It’s winter here, so it is a perfect time for some upgrades on my very small camper van.
I’m making a new center console to fit between the front seats of the van and making some changes to the 12 volt electrical system of the minivan camper.
I’m installing an AiLi battery monitor with a shunt, a new Renogy Wanderer charge controller with a Bluetooth module to use with their BT app, a temperature sensor, USB charging ports, 12 volt sockets and a socket to plug in a genius charger, which I use as “shore power”.
All of this works with my Renogy solar panels - 100 watts on the roof of the van and a 50 watt portable panel that plugs in via as SAE socket - and a 90 amp hour AGM deep cycle battery.
I’ll also show you how to crimp copper lugs onto 4 AWG wires without a crimper. (hint: use a vise and a ball bearing)
I’ll also go over the whole electrical set up, with diagrams, wire and fuse sizes, and show how set the parameters on the battery monitor.
Here are some of the components I used. I don’t have any affiliations or sponsorships:
BATTERY
-Battery: 90 amp hour AGM from a local company, cheap one.
SOLAR IN
- 10 gauge wire with inline fuses between the panels and charge controller: max amps x 1.25 safety factor, then round up: in my case 10 amps for solar side and 30 amps for charge controller towards battery side. (match to amp rating of charge controller)
BATTERY ISOLATOR IN
This is to charge house battery while car is running. A BETTER OPTION is a DC to DC charger. But they were too expensive/not talked about when I was building mine. Some are both solar charge controllers and DC chargers and will also allow you to charge the vehicle battery from your solar...
AC CHARGING IN (shore power, sorta)
FUSE BOX OUT
The wiring I used is all 12 gauge but that is over kill for the watts my system is drawing.
It all goes to some lights, USB sockets for phone charging and fans, and some 12 volt sockets for cooler and inverter.
I will go over these in a futur video, in the spring when I have it all set up again and can film it.
INVERTER
I have an ancient 150 watt inverter, bought, literally, over 20 years ago for playing movies on laptop for kids on long drives. It just plugs in to the 12 V socket, same as it would in a car. It is fine for me as we don't run any AC appliances in the van.
We occasionally use it to charge the laptop, but will be switching over to a DC travel charger soon.
If you have more specific questions, give me a shout and I'll be happy to answer.
Bear in mind: I am not an electrician, just some other fool with a youtube channel, who has done a bit of research for her own system. :-)
 0:25:05
The Best Power System for Vans | Watch Before You Buy Van Electrical System
 0:12:03
DIY Van Electrical System (Full Walkthrough)
 0:20:20
Camper Van Electrical System - Comprehensive Look!
 0:06:56
ALTERNATOR CHARGING OR NOT? (for a camper electrical system)
 0:25:11
This is How I Power My Van | Full-Time w/ Gaming Setup
 0:23:07
The Essential Guide to Camper Van Lithium Battery Power Systems | Van Life Off the Grid with LiFePO4
 1:13:01
DIY Sprinter Camper Van Electrical Install - Full Tutorial
 0:17:12
Step by Step Complete 12 Volt Power System for a Van Conversion
 0:18:10
New Approach to Electrical System in CamperVan (48V)
 0:14:48
HUGE LITHIUM BATTERY UPGRADE FOR OFF GRID VAN LIFE - No Experience Van Build
 0:13:48
Installing off grid 12v camper van electrics | Campervan conversion UK
 0:13:01
Ford Transit Build | Electrical Explained!!!! | Update On The Van Build
 0:26:40
Campervan 12V Electrics Install (We Have Power!) | Transit Van Conversion E22
 2:07:43
DIY Camper Van Electrical Install START TO FINISH w/EXPLORIST.Life Wiring Kits | Van Build Series 12
 0:05:43
How To Wire a Camper Van Electrical Distribution Panel
 0:06:43
Easy 12V campervan electrics tutorial -How to
 0:08:14
12V vs 24V vs 48V (For Camper Electrical Systems)
 0:12:20
How I Installed SOLAR POWER in my VAN (The Easy Way) | Off Grid VAN
 0:23:21
How to Add Shore Power to an Existing Van or RV Power System | Featuring the TS-30 Transfer Switch
 0:30:21
DIY Electrical System Install | Off-Grid ProMaster Van Conversion
 0:11:17
DIY CAMPER ELECTRICAL SYSTEM FUSE PLACEMENT
 0:15:40
DIY CAMPER ELECTRICAL MISTAKES (and how to avoid them)
 0:11:10
Ultimate Guide To Off-Grid Electricity (In A Van)
 0:14:50
Basic Solar Parts Needed for a DIY Camper Van or RV Solar Install
Комментарии