filmov
tv
Dallas DS1287 & DS12887 RTC & other DS RTC Chip Repairs
Показать описание
For other Dallas DS chips not in this video: See Update on the bottom of the comments.
Description: The Dallas DS1287 RTC (Real Time Clock) has an internal battery that over time goes bad. Even the NEW ones since they're still NOS (New Old Stock) either won't work long or won't work at all, as the battery life is only supposed to last 10 years.
A friend of has on old PS2 that won't boot up so, he asked me to install a new backup batter to fix his. This video is how I did the procedure.
ITEMS YOU'LL NEED:
1. 3 - 4" OF WIRE, 20AWG OR CLOSE TO IT.
2. Solder.
3. Soldering Iron.
4. Liquid RMA Flux, ie. KESTER 186
5. 90% OR Higher Isopropyl Alcohol to clean solder joints.
6. Acid Brush with 2/3rds top cut off to clean solder joints.
7. Dremel or Rotary Tool of some kind. Harbor Freight comes to mind.
8. Carbide Grinding Tip MED/SMALL for the Rotary Tool.
9. Coin Battery Button Holder Socket.
10. Optional: 1/8" Heat Shrink about 1/4" long any color.
Let's Begin.
UPDATE Procedure for other DS Chips.
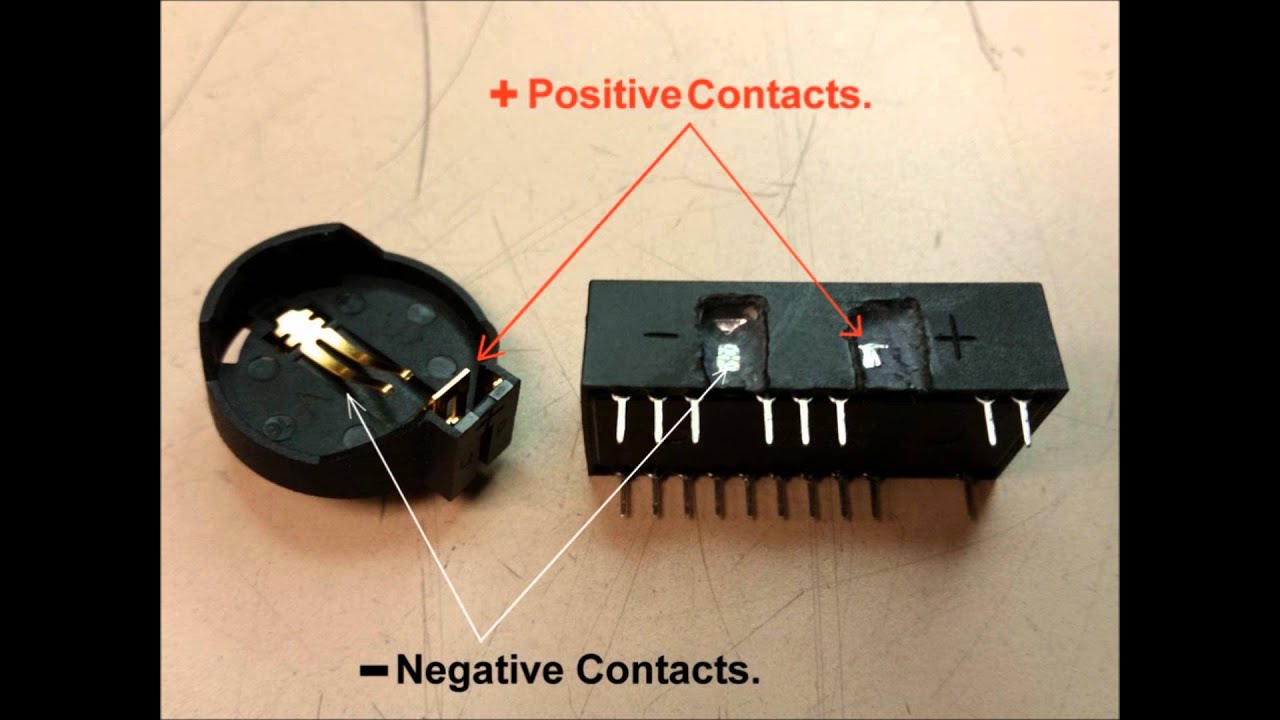
1. CAREFULLY; Grind through the epoxy above ALL the pins to find the battery connections.
2. Connect a digital meter to the pins that have a wire attached to find the polarity, that's if it still has some charge left over, most won't.
3. If it has a charge left over, take note of the positive and negative pins!!!
4. If the old battery doesn't have a charge or if the polarity can't be determined with a meter; then gently grind away the sides until you can get the top off.
5. Grind the away the epoxy to expose the battery and hope the polarity is marked on the battery.
6. If the polarity is not marked on the battery but it has a part number on it, you can look up the battery polarity on line.
7. If the polarity or part number is not marked, you're pretty much done for now. Check the forums, or post a question on a forum to find a solution. Or you can purchase a used on on line and try again.
8. Once you have the battery to pin connections and the polarity connect a backup battery as shown in the later part of the video above.
I hope this helps you in your project.
*** Personally I would take the time to use a Dremel and cut away the epoxy & find the pin connections and the polarity on battery.
- You have nothing to loose anyways since it's already a dead chip.
** If the video helped please take the time to give me a thumbs up for the work I put into it. Best Wishes n Blessings Keith Noneya
Description: The Dallas DS1287 RTC (Real Time Clock) has an internal battery that over time goes bad. Even the NEW ones since they're still NOS (New Old Stock) either won't work long or won't work at all, as the battery life is only supposed to last 10 years.
A friend of has on old PS2 that won't boot up so, he asked me to install a new backup batter to fix his. This video is how I did the procedure.
ITEMS YOU'LL NEED:
1. 3 - 4" OF WIRE, 20AWG OR CLOSE TO IT.
2. Solder.
3. Soldering Iron.
4. Liquid RMA Flux, ie. KESTER 186
5. 90% OR Higher Isopropyl Alcohol to clean solder joints.
6. Acid Brush with 2/3rds top cut off to clean solder joints.
7. Dremel or Rotary Tool of some kind. Harbor Freight comes to mind.
8. Carbide Grinding Tip MED/SMALL for the Rotary Tool.
9. Coin Battery Button Holder Socket.
10. Optional: 1/8" Heat Shrink about 1/4" long any color.
Let's Begin.
UPDATE Procedure for other DS Chips.
1. CAREFULLY; Grind through the epoxy above ALL the pins to find the battery connections.
2. Connect a digital meter to the pins that have a wire attached to find the polarity, that's if it still has some charge left over, most won't.
3. If it has a charge left over, take note of the positive and negative pins!!!
4. If the old battery doesn't have a charge or if the polarity can't be determined with a meter; then gently grind away the sides until you can get the top off.
5. Grind the away the epoxy to expose the battery and hope the polarity is marked on the battery.
6. If the polarity is not marked on the battery but it has a part number on it, you can look up the battery polarity on line.
7. If the polarity or part number is not marked, you're pretty much done for now. Check the forums, or post a question on a forum to find a solution. Or you can purchase a used on on line and try again.
8. Once you have the battery to pin connections and the polarity connect a backup battery as shown in the later part of the video above.
I hope this helps you in your project.
*** Personally I would take the time to use a Dremel and cut away the epoxy & find the pin connections and the polarity on battery.
- You have nothing to loose anyways since it's already a dead chip.
** If the video helped please take the time to give me a thumbs up for the work I put into it. Best Wishes n Blessings Keith Noneya
 0:07:16
Dallas DS1287 & DS12887 RTC & other DS RTC Chip Repairs
 0:03:13
Ultimate RTC module replacement for Dallas DS1287, Benchmarq BQ3287, BQ4287 etc.
 0:05:58
Revised: Repairing Real-Time Clock Battery (Dallas DS1287 / Odin OEC12C887)
 0:05:01
Repairing Real-Time Clock Battery (Dallas DS1287 / Odin OEC12C887)
 0:10:01
Next-level RTC module Upgrade! Replacing the Dallas DS12887
 0:27:33
Dallas DS1287 Real-Time Clock Modification, Start to Finish!
 0:05:27
How to replace Dallas RTC chip DS1287 in a Ten Tec Paragon 2 transceiver on the boot board
 0:15:20
RTC Battery Replacement - Dallas DS12887
 0:34:05
Návod pro opravu RTC Dallas DS1287/1187
 0:08:28
ASUS P55T2P4 - Drained Dallas DS12B887 Battery
 0:03:12
Amstrad PPC RTC Clock Chip Swap Dallas DS12887
 0:03:54
Dallas ds12887a ds12b887 rtc desoldering.
 0:11:52
Building a nwX287 by @necro_ware with @PCBWay to Replace a Dallas DS1287 RTC (Computerized Start™)
 0:13:21
Desoldering Dallas DS1287 timekeeper and adding external battery
 0:11:47
Dallas Clock Chip Replacement for a 486 motherboard with a special guest appearance by Gollum
 0:11:42
Modding a Dallas DS1287 for a 55SX
 0:28:43
Hacking the DS1287 RTC live in-place (not recommended)
 0:10:58
IBM PS/1 2011 Pt 2: DS1287/DS12887 old computer repair hack
 0:06:40
Dallas Realtime Clock Repair pt 1
 0:07:01
Dallas Realtime Clock Repair pt 2
 0:00:51
DS12C887
 0:41:05
Dallas Chip Part 1: How to revive a dead DS12887 chip
 0:13:37
Retrocomputing, Odin OEC12C887A RTC replacement with Dallas DS12887A
 0:03:50
NWx287 RTC Module CR2032 edition
Комментарии