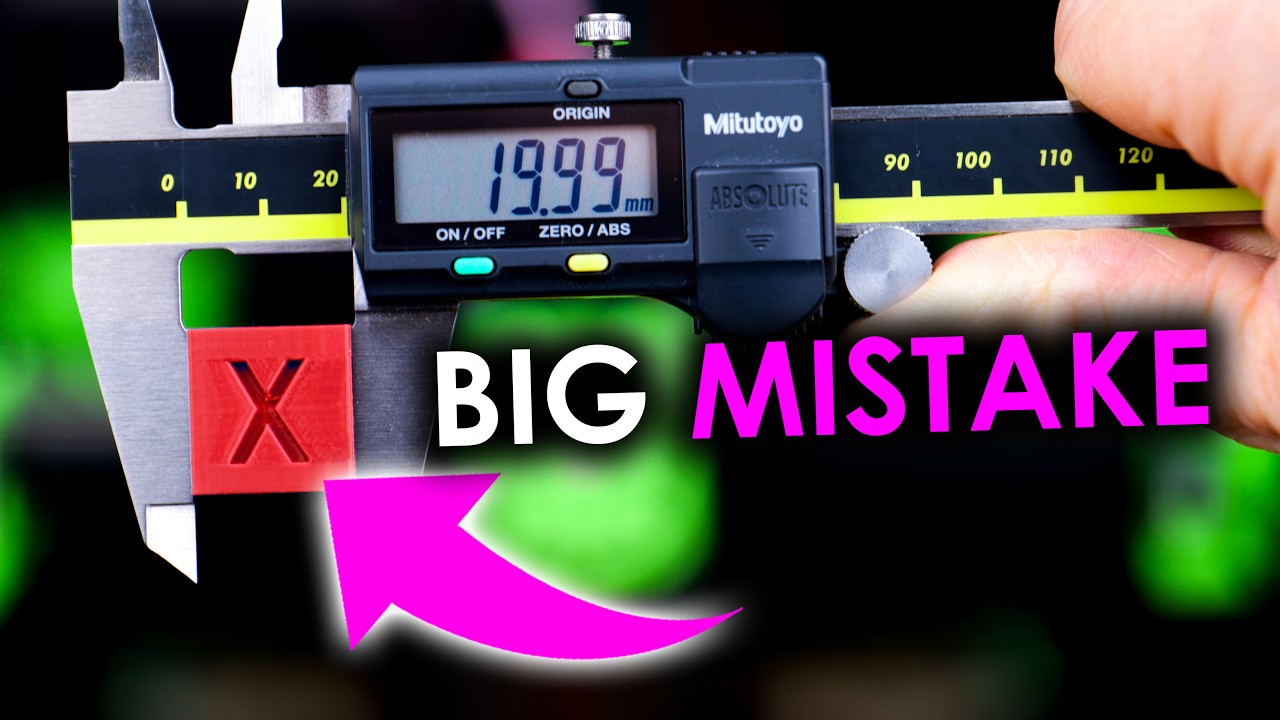
Calibration Cubes: More Harm Than Good?

preview_player
Показать описание
Too many people seem to calibrate their 3D printers with calibration cubes. I think this is a bad idea. In this video, I’ll show why calibration cubes are bad, how you properly tune your printer's dimensions, and how accurate the machines I have in my studio are!

💚 Support me 🙏
Join as a YouTube member!

📚 Printed Models:

⚙ My gear:
🎥 CAMERAS & LENSES
🎙AUDIO
🔴 LIVE STREAMING

*Chapters*
00:00 Introduction
00:49 Anecdote
01:17 3D Printer Calibration
02:09 Accuracy of a 3D Printer
03:05 The letdowns of Calibration Cubes
04:10 3D Printer Skew
05:08 The CaliFlower
05:41 Calibrating my RatRig
08:01 Sponsor
09:40 Applying Calibration
12:10 Testing my 3D Printers
14:30 Which Skew is acceptable?
14:50 Uses for the Calibration Cube

#3Dprinting #calibration
DISCLAIMER: Part of this video was sponsored by Squarespace.
FTC Disclaimer: A percentage of sales is made through Affiliate links
Рекомендации по теме
Комментарии
Автор

Hi everyone, Adam from Vector3D here.
Little update: we now support Bambu Labs skew correction! 🎉
At the time of the video Bambu Labs didn't have skew correction in their firmware so it needed a workaround, but now they do. Bambu Labs have said their implementation is currently still in testing at the (time of writing) so you might get some unintended consequences. That said, from my testing, it seems to work fine.
Thanks again Stefan for such a great video covering Califlower!

VectorDP
Автор

Really classy move helping Adam improve his calibration flower and pointing your viewers in his direction! Love it

sjkba
Автор

But I love stepping on stray calibration cubes in the middle of the night

girrrrrrr
Автор

Firstly, I'm sold, but secondly, extremely casual mention Adam's cancer diagnosis! Funny delivery aside, love to see makers supporting makers

jonathanballoch
Автор

I love the califlower: after making tweaks, it's a single print that gives me confidence that everything is still working as expected. The older califlower is the only STL I've ever paid for, and I paid mostly for the support files. It was worth every penny, and the new design looks even better. Highly recommended if you are someone who mods their printer, even if you mostly print aesthetic parts: you're gonna need good accuracy on any new mod parts.


I especially appreciate what look like caliper supports in the design, as getting the calipers square for all the measurements is the biggest pain the ass through the whole process.

joshmyer
Автор

I bought the Califflower back in Nov 2022. I appreciate the work Adam put into the design. Very much worth the small download fee.

lv_woodturner
Автор

This is so perfect. Measuring mounting holes and creating a mount has been the best real accuracy test. I use a hole center calibrator. Checking a calibration hole (inner dimension) in an object is very different than measuring a cube. Hole center to center is the best method. Thank you for this video!!!

heyitsjay
Автор

This made me happy. When I first started 3D printing, I printed out maybe 50 of the cubes. They were so new that... they were just cubes. No XYZ labeling or brands or whatnot. And I wasn't printing it for dimensional accuracy, I was so new I didn't think that was an important thing at that point, I printed them just to try and get a successful print. "Did the top layer look bad? Did it even get past the first layer?" etc. Fast forward: I've ignored so many of these tests for a simple reason - I just want to print stuff, not spend all my time calibrating my printed. I'm glad to see basically all the printers you tested have small skew and dimensional issues. You have a good point though: what is the acceptable amount of inaccuracy?

That's a different topic. But the 2 things on my mind:

1) a pet peeve that you're slowly smashing - ending hearsay in 3D printing. Enough of this "print one of these and you'll have have a good print" "it works for me" "run a temp tower" "no, temp towers are useless, do this calibration print" "make sure you calibrate your e-steps before you check dimensions" "wait, I though dimensions was for checking e-steps" wait wait... stop, can we just get an instruction sheet that we should be doing that produces a reproducible result? I remember you trying some service on Meltzone Podcast where you basically got sets of gcode to run, printed them, then answered some questions. Similar to a game called Q20/20 Questions, and at the end it gave you a printer/filament profile that was "perfect". There's a ton of calibration tests out there, some built into slicers, some separate, some free, some cost money... I'd love for some system, paid or not, that you could run the set of tests, get a profile or similar out of it, and move on. At the time that Q20 profile generator was discussed on Meltzone, it did basics. But now we have printers with flow calibration, input shaper, and more. And one thing not covered by any of them, is they don't take into account wear. Like, imagine getting a new printer, run the first run... it spits some random models out, you answer some questions... it auto-calibrates the machine (hey Prusa, when you gonna add that skew adjustment to the MK4/XL/Mini?), and then you move on. Have the slicer be able to do the same for filament. But then in a month or two, you can do a small print and find out if you need to rerun the calibration or not. A canary of sorts. I made the mistake of using the same brass nozzle for like 4 years, no carbon fiber or whatnot, but I finally went to replace it and found the 0.4 nozzle was closer to 0.55mm. Oops... but I had no real sign of this and it's not like I memorized how well things fit together from 4 years prior.

2) ERRF 2019 had a keynote speaker that was great to listen to: Adrian Bowyer. History and some ideas for things in the future... and he commented on this exact topic. That these were imprecise machines. And he proposed something... if the nozzle could tell when it makes contact with something in more then one dimension, it could be used to calibrate itself. Think: print the infamous 20mm calibration cube, it then cools, then pokes it... and finds out that it's 20.01mm, so it adjusts itself so it's next print is 20mm. Of course, this isn't some ground breaking concept... this is used by CNCs to find their source material, inspection systems, and in the 3-4 years since then (depending on how you want to measure time :P), we've gotten strain gauges on all the things and the Prusa XL literally does this to calibrate nozzle location between tool heads. It isn't fast, but at least you don't need to buy an external camera or similar. But the point is: it's there... right now. "We have the technology" we just need to use it.

rcmaniac
Автор

I never thought about skew correction on my 3D printer until I experienced a lid not aligning fully some weeks ago. The califlower has been a great help correcting for it as well as adjusting the shrinkage in the slicer!

ChrisFloof
Автор

Great video, but the one part you definitely should have included is *why* it's a bad idea to adjust steps/mm: Because the steps per millimeter can be mathematically calculated based on the number of teeth on your motor's pulley and the pitch of the belt. The only way they can be off is if the belt is stretched.
If it's off, it's either shrinkage or under/over-extrusion, either of which should be compensated for in the slicer (as you pointed out).

glabifrons
Автор

Great Video- I've always used the Cube for quick- "Corner Bulge' and "Ringing" and Tuning in the "Top Layer/Ironing" but remember back in the early RepRap days guys saying don't use it for Measuring and it didn't take long to realize but here we are 10yrs later

All the Best-.

Mindless_One
Автор

Loved the video. I caught on to the Vector3D Califlower a few years ago and it really helped me tune my Ender 3V2. I saw another video awhile back from a youtube creator that was making collector card holders who first mentioned calibrating to a larger dimension due to the percent error you find with a smaller calibration cube. His explanation and Vector 3D really solidified the idea/theory for me. Its funny you had the same issue with measuring with calipers and got him to update the model. Thank you for letting us know there is a new model that we can snag now at no additional cost.

bulgogiprince
Автор

I had always made my own calibration blocks (usually modeled off 1-2-3 machining blocks) with chamfers and radii to avoid the issues you mentioned. The cauliflower looks great and I will have to go pick that up.

Beltonius
Автор

You can also just use a dial indicator to check the distance of your travel moves. This eliminates any variables from extrusion width, , shrinkage etc. and purely check the motion system to see if a 20mm travel move is exactly what it should be. Adjust steps/mm from there.

I know not everyone has a dial indicator, but they aren't expensive.

Brainstormer_Industires
Автор

I haven't trusted prints for calibrating X, y and z rotation distance for quite a while. I bought a dial indicator with 50mm measuring distance and an accuracy of 0.1mm used and it served me well for calibrating lengths. Also I agree that the scew measurements with the califlower are tempting...

jawolllinger
Автор

I really love your takes on 3D printing, you have a unique understanding in engineering and that shows. I fell into this cube trap as well without even thinking about it... the effect of "this must work as so many use it".

VincentGroenewold
Автор

Good data, and you make a good case for sure! I've often printed my calibration cubes much larger, usually around 100mm, but I really like the additional checks and balances from the califlower! I'll definitely be supporting that project, and once I get my printer set back up, I'll have to look into all of the calibration methods pointed out in this video, especially skew!

KiyoshiKatu
Автор

Feed those cubes to the shredder then the Artme3D. Just hope the Companion Cube isn't watching!

soundspark
Автор

This, signle point dimensional calibration is my pet peeve.

Two points are an improvement, but I prefer 10-20, shrinkage isn't always perfectly consistent. I once designed calibration square that let you measure both XY shrinkage and skew with 40 data points (technically 38), the only downside was that it had limited capability for measuring internal dimension.

tymoteuszkazubski
Автор

Callipers can vary a fair amount in accuracy. If you get a cheap micrometer then you can use that to calibrate the callipers. Also, be aware that you must manually apply consistent pressure with callipers, while a micrometer should have a friction wheel that applies a set amount of force each time.

boggisthecat