filmov
tv
Basics of Arduino - LED Control With Button

Показать описание
Please click this link for the code and schematic diagram:
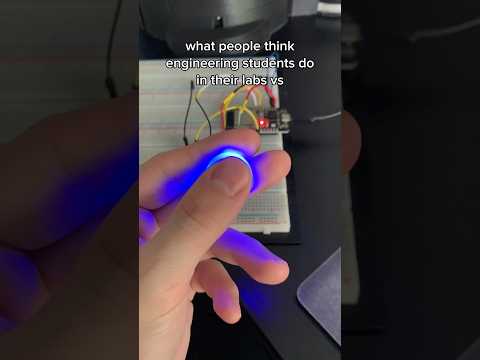
LED Control With Button
In this experiment, you will learn how to turn on/off an LED by using an I/O port and a button. The "I/O port" refers to the INPUT and OUTPUT port. Here
the INPUT port of the Arduino Uno board is used to read the output of an
external device. Since the board itself has an LED (connected to Pin 13), so
you can use this LED to do this experiment for convenience.
Principle
Buttons are a common component used to control electronic devices. They
are usually used as switches to connect or disconnect circuits. Although
buttons come in a variety of sizes and shapes, the one used here is a 12mm
Tactile button as shown in the following pictures. Pins pointed out by the
arrows of same color are meant to be connected.
When the button is pressed, the pins pointed by the blue arrows will connect
to the pins pointed by the red arrows.
Generally, the button is directly connected in an LED circuit in order to turn on or
off the LED. This connection is relatively simple. However, sometimes the LED
will light up automatically without pressing the button, which is caused by
various interferences. In order to avoid these external interferences, a pull-down
resistor is used, that is, to connect a 1K–10KΩ resistor between the button port
and GND. It is used to consume external interferences while connected to GND
for as long as the button switch is turned off.
This circuit connection is widely used in numerous circuits and electronic
devices. For example, if you press any button on your mobile phone, the
backlight will light up.
Related search:
arduino
arduino projects
LED Control With Button
led
control
button
push button
arduino projects 2019
engineering projects
computer engineering projects
engineering thesis
electronics stuff
electronics engineering projects
simple arduino projects
basic arduino projects
easy arduino projects
arduino uno
how to make
electronics
diy
how to
LED Control With Button
In this experiment, you will learn how to turn on/off an LED by using an I/O port and a button. The "I/O port" refers to the INPUT and OUTPUT port. Here
the INPUT port of the Arduino Uno board is used to read the output of an
external device. Since the board itself has an LED (connected to Pin 13), so
you can use this LED to do this experiment for convenience.
Principle
Buttons are a common component used to control electronic devices. They
are usually used as switches to connect or disconnect circuits. Although
buttons come in a variety of sizes and shapes, the one used here is a 12mm
Tactile button as shown in the following pictures. Pins pointed out by the
arrows of same color are meant to be connected.
When the button is pressed, the pins pointed by the blue arrows will connect
to the pins pointed by the red arrows.
Generally, the button is directly connected in an LED circuit in order to turn on or
off the LED. This connection is relatively simple. However, sometimes the LED
will light up automatically without pressing the button, which is caused by
various interferences. In order to avoid these external interferences, a pull-down
resistor is used, that is, to connect a 1K–10KΩ resistor between the button port
and GND. It is used to consume external interferences while connected to GND
for as long as the button switch is turned off.
This circuit connection is widely used in numerous circuits and electronic
devices. For example, if you press any button on your mobile phone, the
backlight will light up.
Related search:
arduino
arduino projects
LED Control With Button
led
control
button
push button
arduino projects 2019
engineering projects
computer engineering projects
engineering thesis
electronics stuff
electronics engineering projects
simple arduino projects
basic arduino projects
easy arduino projects
arduino uno
how to make
electronics
diy
how to
 0:07:59
 0:03:53
 0:16:34
 0:05:52
 0:15:57
 0:02:50
 0:09:53
 0:01:01
 0:00:21
 0:11:51
 0:04:56
 0:00:14
 0:05:10
 0:04:44
 0:00:11
 0:00:22
 0:05:36
 0:00:17
 0:00:11
 0:00:40
 0:00:30
 0:00:08
 0:00:27
 0:00:34