filmov
tv
VESA Mounts
Показать описание
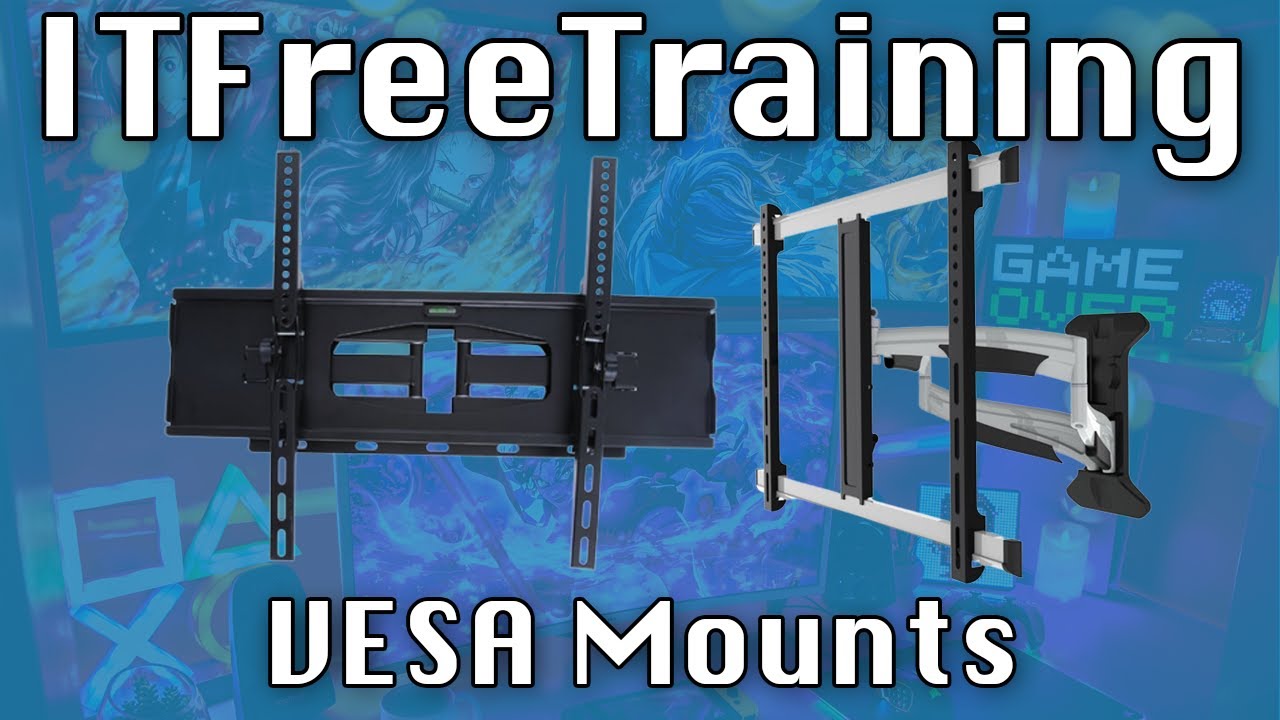
In this video from ITFreeTraining, I will look at VESA mounts. A VESA mount is a standard that allows a monitor to be mounted to a supporting arm or bracket to hold it in place. This video will inform you what you need to look for when purchasing a VESA mount.
VESA Mounts
0:16 A monitor mount is a supportive bracket or arm designed to hold up a display. It is created to an industry standard so that if you purchase a monitor, you just need to purchase a VESA mount that is compatible with the monitor. This makes the process of mounting a monitor to a wall, arm or stand a lot easier.
Colloquially it is referred to as a VESA mount. However, the technical name is Flat Display Mounting Interface or VESA Mounting Interface Standard. With names like those, you can see why they just call it a VESA mount.
The vast majority of monitors and TVs on the market will have a VESA mount. In order to mount your screen, you just need to purchase a stand, adapter or arm with the VESA mount for the screen. Let’s have a look at how to do this.
Specifications
1:05 To attach a VESA mount, you will find that at the rear of the monitor are four screw holes. These screw holes are what attach to the arm, stand or adapter you are using with the monitor. In order to find one that is compatible, they are made so they are a particular width and height.
The width and height is measured in millimeters. This measurement forms the specification for which VESA mount you should be purchasing. For example, if the screw holes were both 100 millimeters away from each other the VESA mount would be 100x100.
In some cases, the screw holes may be hidden. In order to locate them, the monitor stand may need to be removed. In some cases, the stand may be removed using a quick release clip, and at other times it will need to be unscrewed.
In most cases, you will want to remove the monitor stand as it will get in the way if left on. If it does have any screws in it, one trick to avoid losing them is to put them in the screw holes of the stand and use some tape to prevent them falling out. This way, you don’t lose the screws and if you need to use the stand again you know where the screws are.
Let’s have a look at how to attach an arm to a monitor using a VESA mount.
Demonstration
2:14 In this demonstration, I will attach a monitor to one of the connectors of this dual monitor arm. This arm has a clamp that attaches it to the table. Using this arm, it allows the monitor to be easily swiveled around and also rotated between portrait and landscape.
To start with, I will lay the monitor flat and remove the four screws that are holding the monitor’s stand in place. Once the screws are removed, I can pull the monitor stand away from the monitor. Be careful when doing this, so as not to drop the monitor and risk damaging it.
The next step is to attach the arm; you will notice that there are two sets of screw holes. One set is for 75x75 and the other one for 100x100. It is just a matter of screwing in the four screws to attach the arm to the monitor.
With a monitor like this, it has a clamp that is attached to a table. This brings us to the next important considerations to think about before you purchase.
Considerations
3:17 The first thing to consider before purchasing is the weight or size limit of the arm or other device you are purchasing. Even if the connector has the correct sized VESA mount, if the screen is too heavy or too large, you risk damaging the screen.
You can see, in this example, the arm is not able to hold the monitor and the monitor fell onto the floor. This can damage the monitor. You don’t want to have this happen to your expensive monitor.
The next point to consider is how the clamp on the monitor will be attached. In the case where our monitor fell onto the floor, you can see how the clamp was connected under the table. The table in this case has a thick edge which only goes a short distance, but under the table it is quite thin by comparison. For this reason, the clamp connection is uneven and thus a poor connection, resulting in the monitor falling onto the floor.
References
“CompTIA A+ Certification exam guide. Tenth edition” Pages 758-759
Credits
 0:05:04
$25 vs. $300 Monitor Arm - What Stands Do I Recommend?
 0:02:15
What is VESA? | How to measure VESA | How to Find the Right VESA Mount for Your TV
 0:09:47
These are ESSENTIAL for PAIN-FREE Triple Screen Mounting | Trak Racer Variable Vesa Mounts
 0:08:34
DO NOT Buy A Monitor Arm Until You’ve Watched This Video
 0:00:52
Apple Studio Display + VESA Mount Adapter Setup #Shorts
 0:00:11
The vesa adaptor and the mount works for my HP27f4k
 0:00:13
Apple Studio Display + Vesa Mount Unboxing #shorts
 0:02:05
What is VESA | How to measure VESA | How to Find the Right VESA Mount for Your TV
 0:05:40
Vesa Mount for NON - Vesa Monitor | How To
 0:00:17
Armstrong Swivel/Tilt TV Wall Mount | Harbor Freight #shorts
 0:07:11
Wacom Cintiq Pro 24 VESA mounts for Ergotron arms [pt1]
 0:20:37
Studio Display with VESA – COMPLETE REVIEW
 0:02:01
What is VESA? – How to Find the Right VESA Mount for Your TV | Kanto Solutions
 0:00:38
VESA Mount Adapter Mounting Kit for Non-VESA HP ACER Samsung DELL Asus Monitors (MI-780)
 0:01:58
Universal Vesa Mount Bracket kit Varient
 0:00:32
2024 10 13 Apple Pro Display XDR VESA mount stand at desk level gray and black @ ~17.5° angle
 0:06:35
Every Monitor Mount Should Be Like This | Reviewing the Sim-Lab Vario Vesa Mount
 0:00:49
How to Install CREAT3D VESA Adapter on HP U27 4K Wireless Monitor
 0:08:26
OFFICIAL Wacom Cintiq Pro 24 VESA mounts for Ergotron arms pt2
 0:02:01
3D Printable VESA Mounts for the Argon One and M.2 Raspberry Pi 4 Case
 0:01:04
MOUNT-DLSSE2 VESA Adapter for Compatible Dell Monitors by VIVO
 0:00:34
MOUNT-AD165 Vertical VESA Extender Kit by VIVO
 0:00:31
Gladiator Joe® Mount VESA Bracket Adapter Compatible with Dell S2340L, S2340M, S2240L, S2240M - R1
 0:14:02
VESA Monitor Mount 9.Solutions VESA Mount vs Tether Tools VESA Studio Mount
Комментарии