filmov
tv
How to Add & Use Adjustment Layers in Adobe Premiere Pro CC

Показать описание
On this episode of The Piedmont Motion Picture Show, we're talking about how to add and use adjustment layers in Adobe Premiere Pro CC.
INTRO - 00:00
TUTORIAL START - 0:58
OUTRO - 3:00
I'll show you how to create and apply an adjustment layer over top of your footage, and how to apply color grades or effects to the layer, so that you can affect multiple clips at once.
Adjustment layers in Adobe Premiere Pro CC (2019) are a great way to add color grades and effects to your footage, and really open up a door of great possibilities.
----------------------------------------------------------------
Thank you so much for being here! If you like what I do, and would like to help support the channel, there are many ways to do that:
*Affiliate Link
Let's become better filmmakers together!
Love,
-Ryan
▲MY SOCIAL LINKS
This channel is dedicated to North Carolina filmmaker, Ryan Camp. This channel features Filmmaking Tutorials, Music Video Tutorials, how to be a Filmmaker Videos, Filmmaking Tips & Tricks, Behind the Scenes, Short Films, Cinematography Tutorials, How to Make Better Videos Tutorials, Video Editing Tutorials, Adobe Premiere Tutorials, Adobe After Effects Tutorials, Gear Reviews, Gear Tutorials, & More! New Videos are Posted Every Week!
#filmmaking #filmmakers #campfilms #ryancamp
 0:01:47
How To Use Add Formula In Apple Numbers
 0:09:07
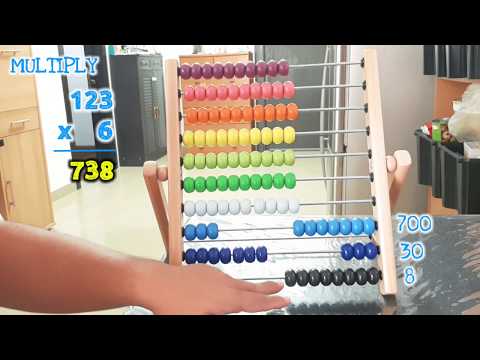
How to use the abacus, Add, Subtract, Multiply, Divide /GTflix
 0:02:13
How to Use 'Add Yours' Sticker on Instagram
 0:02:20
How to ADD and Use MULTIPLE INSTAGRAM Accounts - Up to 7 Accounts
 0:10:37
How to use Market Internals. You NEED to know this!!! $ADD/$VOLD/$TICK Tutorial
 0:00:51
How to add and use Google account on your Chromebook
 0:22:59
I forced EVERYONE to use Linux
 0:00:38
3DsMax - Use 'Connect' to add edge
 0:03:38
How to use Joyful Minimalism to add happiness and zest to a minimalist lifestyl
 0:07:20
Word 2016 - Bookmark Cross Reference & Hyperlink - How to Add Use Insert Bookmarks References in...
 0:01:33
How to Add Debit Card to Cash App [Link and Use in Bank Money Account]
 0:10:54
Lucas Stop Slip - How to Add/Use 2.0 (Explained/Tested/Reviewed)
 0:05:32
Excel Operators: How to Add, Subtract, Divide, Multiply, and use Brackets in Excel!
 0:02:02
How to Install and Use Excel Add-Ins | Add-Ins Tutorial
 0:04:32
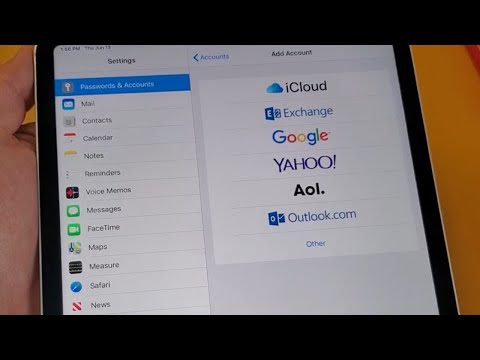
iPad Pro: How to Add Gmail (Email) Address & Use (Setup Multiple Gmail Accounts)
 0:02:30
How To Add & Use Gboard (Google Keyboard) On iPhone
 0:03:44
How To Add & Use Link Reader ChatGPT Plugin?
 0:01:44
How to use the route add command in all versions of Windows
 0:00:33
How to Use Curve | Add A New Card
 0:00:38
ZKTeco SA40B How to add card use administrator password
 0:00:30
Unreal Engine - How To Add/Use Animations
 0:07:42
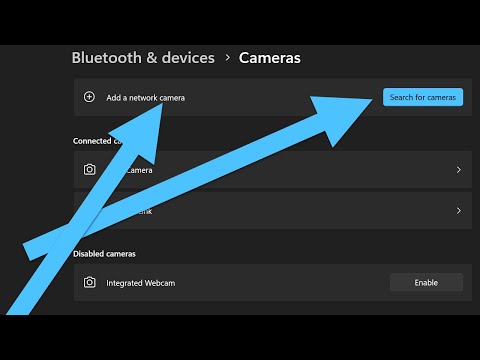
How to add a network camera in windows 11 and use as your web cam
 0:00:57
How To Add & Use Multiple Telegram Accounts on iPhone 13 - Kareemm [4K]
 0:02:25
How to add Face ID to apps iPhone 14 - How to use face id to install apps from app store
Комментарии