filmov
tv
How to Flush DNS on Windows 10 :Tutorial

Показать описание
The DNS stores information about an IP address of a website in your PC’s memory. It saves time, but if DNS is corrupted then it may give you an error and a website will not open.
In this video, we will learn to flush DNS cache on Windows 10. Follow the steps as shown in this video.
1. Click on the Windows search bar at the bottom left of the taskbar.
2. Type CMD in the search box.
3. From the search result, select Command Prompt.
4. Click on the Run as administrator.
5. Click on the Yes button to allow the app.
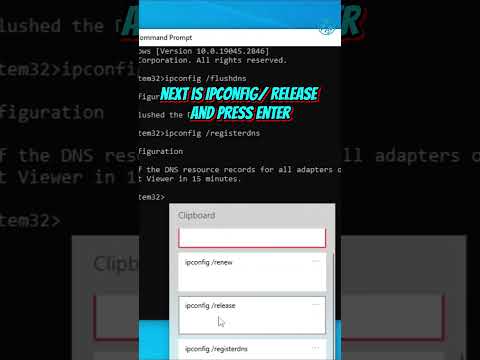
6. In the command prompt window, type ipconfig /flushdns and press the Enter key on your keyboard.
7. After some time, you will see a message in the command prompt window, “Successfully flushed the DNS Resolver Cache”.
8. This means the DNS on your PC has been flushed.
9. Close the command prompt window.
10. In our second method, we will use Windows PowerShell.
11. Right-click on the Windows start icon.
12. From the dropdown list, click on the Windows PowerShell (Admin) option.
13. Click on the Yes button to allow permissions.
14. In the PowerShell window, type ipconfig space /flushdns and press the Enter key on your keyboard.
15. The DNS cache will be flushed.
Hope this was easy to follow. Thanks for watching!
Please subscribe to our channel.
Disclaimer: Content in this video is provided on an "as is" basis with no express or implied warranties whatsoever. Any reference of any third party logos, brand names, trademarks, services marks, trade names, trade dress and copyrights shall not imply any affiliation to such third parties, unless expressly specified
In this video, we will learn to flush DNS cache on Windows 10. Follow the steps as shown in this video.
1. Click on the Windows search bar at the bottom left of the taskbar.
2. Type CMD in the search box.
3. From the search result, select Command Prompt.
4. Click on the Run as administrator.
5. Click on the Yes button to allow the app.
6. In the command prompt window, type ipconfig /flushdns and press the Enter key on your keyboard.
7. After some time, you will see a message in the command prompt window, “Successfully flushed the DNS Resolver Cache”.
8. This means the DNS on your PC has been flushed.
9. Close the command prompt window.
10. In our second method, we will use Windows PowerShell.
11. Right-click on the Windows start icon.
12. From the dropdown list, click on the Windows PowerShell (Admin) option.
13. Click on the Yes button to allow permissions.
14. In the PowerShell window, type ipconfig space /flushdns and press the Enter key on your keyboard.
15. The DNS cache will be flushed.
Hope this was easy to follow. Thanks for watching!
Please subscribe to our channel.
Disclaimer: Content in this video is provided on an "as is" basis with no express or implied warranties whatsoever. Any reference of any third party logos, brand names, trademarks, services marks, trade names, trade dress and copyrights shall not imply any affiliation to such third parties, unless expressly specified
 0:00:14
 0:01:22
 0:03:38
 0:00:51
 0:08:55
 0:00:18
 0:00:17
 0:00:33
 0:00:59
 0:00:33
 0:00:26
 0:00:55
 0:02:44
 0:00:41
 0:00:47
 0:00:15
 0:00:59
 0:02:32
 0:01:30
 0:01:48
 0:04:49
 0:00:44
 0:02:04
 0:03:39