filmov
tv
Bolt on Front Suspension and Steering for 1963-1987 C10 with Scott’s Hotrods N Custom IFS System

Показать описание
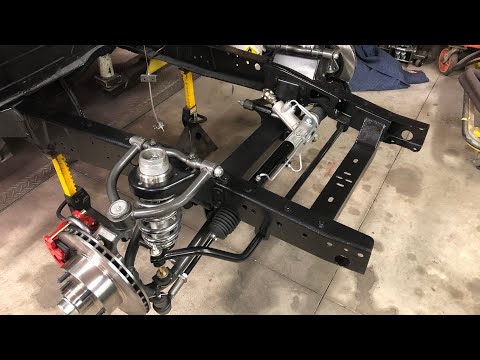
In some sense, owning a classic truck is one of the best options for a project vehicle. They offer timeless style, the utility of a bed for weekend trips to the hardware store, and room underhood for a stout, all-American V-8. What they don’t typically offer, though, are handling characteristics that inspire confidence when driving alongside modern traffic. Our ’64 shortbed C10 is no different. We plan to build it into a fun weekend run-about but not before bringing its suspension, steering, and stopping capabilities up to contemporary standards.
So, what about our setup? Did we go bare bones or tick every box possible? Turns out, the sweet spot for us was somewhere in the middle. We passed on powdercoating since we had yet to decide on color and we also opted for the standard single-adjustable Aldan American coilover option, trusting it would give us just the right amount of ride quality and adjustability we needed. We did upgrade to a power steering rack to make around-town cruising more enjoyable and LS motor mounts to support the truck’s future motivation. Adding a sway bar was also a must, and we decided on the beefier of the two sway bar options. Finally, we decided a stouter brake package would be ideal, so we went for the upgraded Wilwood six-piston caliper with drilled, slotted, and vented 14-inch rotors (but we’ll get to that part of the install in Part 2 of this saga).
Before getting into the meat of this install, we’ll make a little note here to acknowledge the work that’s already been done on our ’64 C10. This being a pretty comprehensive build, our truck was already stripped down to a cab and bare framerails up front. Keen readers will recognize the truck from the Dec. ’22 issue of Classic Truck Performance where Jason Scudellari removed the front subframe and steering to coat the frame in POR-15. In the future we’ll be installing new sheetmetal and a completely new engine/transmission combination, so it just made more sense to start on the front IFS system while everything else was out of the way. If you’re doing this upgrade on your truck at home, not much should change other than working around existing sheetmetal and having an engine to support.
Check back next month for Part 2 when we’ll cover the Wilwood brake portion of the Scott’s Hotrods IFS install.
1. With the factory subframe and steering box removed, Jason Scudellari began by supporting the front of the framerails with jackstands. Then he held the new IFS subframe in place using a floor jack.
2. With the provided hardware, Scudellari found the holes in the Scott’s Hotrods subframe that line up with the original holes in the frame and bolt it on.
3. The top three holes in the frame that secure the frame boxing cradle needed to be drilled out for the larger hardware.
4. There are also a few more holes that need to be drilled in the frame to fully attach the IFS subframe—an easy task with the subframe bolted in place already.
5. Make sure to fully tighten the subframe hardware on the inside of the framerails before installing the frame boxing cradle.
6. Each cradle is marked with “DS” or “PS” on the top to note which side of the truck it should be installed (also note the pre-welded tabs for the LS motor mounts we selected).
7. Getting those center nuts on the top and bottom of the cradle can be challenging but certainly not impossible, so just take your time.
8. Once all the hardware on the subframe and boxing cradle is installed and torqued to spec, you’re ready to move onto the suspension and steering.
9. The control arms were all labeled for upper or lower and passenger or driver side. Install a washer on either side of each arm then snug up the bolts, but do not overtighten them.
10. Scudellari proceeded to install the Aldan American coilover shock using the supplied hardware. It is generally easiest to leave the collars on the coilover at their lowest position for installation then go back and dial up the ride height later.
11. Install each billet upper control arm mount with three washers against the crossmember and one washer on the outside.
 0:01:28
Bolt-in Independent Front Suspension from Speedway Motors
 0:01:14
Bolt on Front Suspension and Steering for 1963-1987 C10 with Scott’s Hotrods N Custom IFS System
 0:01:09
QA1 Bolt-In Mopar Suspension
 0:12:43
Bolt on Independent Front Suspension - Part 1
 0:01:29
Speedway Motors Bolt-in IFS Crossmember (Key Features)
 0:29:39
Bolt on Independent Front Suspension Install - Part 3
 0:11:23
how to install a bolt in independent front suspension for 1965-1979 F100 F150 pickups
 0:14:24
Time to Bolt-On on the QA1 C10 Front Suspension Kit & Race Star Wheels
 0:11:36
We install Ridetech BOLT-ON Coil-Over / Air Suspension for 1965 - 1979 Classic Ford Truck
 0:14:58
Bolt on Independent Front Suspension install - Part 2
 0:02:53
The Life of a Bolt
 0:14:15
UMI Performance - Bolt In Chassis Stiffening - for A-Body's
 0:50:43
ONE NIGHT ONLY! Stock To Gasser BOLT-ON Front End - 1964 Chevy II
 0:01:30
Total Control Products - Bolt-In Front Coil-Over Conversion
 0:16:38
Monster Truck Kart Pt. 3 | Bolt-In Front Suspension
 0:00:21
AUDI PINCH BOLT REMOVER TOOL
 0:22:16
55 Chevy Build Bolt on Mustang II Crossmember and IFS
 0:03:27
Frozen Stuck Strut Bolt? Try These Tricks Before Cutting It!
 0:12:51
American Suspension Bolt on Neck Kit Installation Guide
 0:03:50
Pichler Tools VAG Seized Top Suspension Bolt Removal Tool VW AUDI
 0:10:52
MORryde CRE3000 Suspension & Wet Bolt Install
 0:01:01
Did you know Aldan American has almost 400 direct Bolt-On & Go Kits?
 0:02:42
camber bolt install
 0:00:34
Milwaukee® BOLT™ Head Protection and Accessories
Комментарии