filmov
tv
How to Build a RecyclerView from a JSON Parser in Android

Показать описание
Discover how to effectively parse JSON data into a `RecyclerView` in your Android app using a simple step-by-step approach.
---
Visit these links for original content and any more details, such as alternate solutions, latest updates/developments on topic, comments, revision history etc. For example, the original title of the Question was: Json parser to RecyclerView in Android?
If anything seems off to you, please feel free to write me at vlogize [AT] gmail [DOT] com.
---
How to Build a RecyclerView from a JSON Parser in Android
Handling data in Android applications can often be challenging, especially when it involves parsing JSON and displaying it in a RecyclerView. If you've found yourself stuck trying to display data from a JSON response, you're not alone. In this guide, we'll simplify the process of parsing JSON into a RecyclerView by breaking it down step-by-step.
The Problem Statement
Imagine you have a JSON response that looks like this:
[[See Video to Reveal this Text or Code Snippet]]
Your goal is to display this data in a RecyclerView. However, you might encounter challenges when trying to access the JSON data and pass it correctly to your adapter. Let's solve this step by step.
Step 1: Create the InfoBean Class
The first thing you need is a model class to hold the data from your JSON. In our case, we'll create a class called InfoBean. This class will store each key-value pair from the JSON response.
[[See Video to Reveal this Text or Code Snippet]]
Key Components of InfoBean
Attributes: key and value to hold the corresponding values from the JSON.
Constructor: To initialize the object when new data is parsed.
Getters: To access the key and value if needed later.
Step 2: Parse the JSON
Next, you need to parse the JSON string to create a list of InfoBean objects. Here's how to do it:
[[See Video to Reveal this Text or Code Snippet]]
Explanation
JSONObject: Represents the overall JSON structure.
JSONArray: Allows us to handle the array of "info" objects.
We iterate through the JSONArray, extract each key-value pair, and instantiate the InfoBean class to store the data.
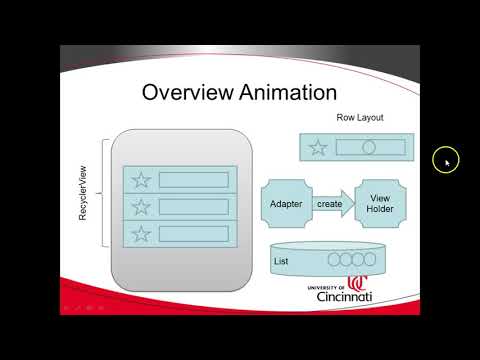
Step 3: Pass Data to the Adapter
Lastly, you will want to set up your RecyclerView and pass the infoBeanList as follows:
[[See Video to Reveal this Text or Code Snippet]]
This assumes you have an adapter class (e.g., MyAdapter) that properly handles the list of InfoBean objects.
Conclusion
By following these steps, you should now be able to parse JSON data and display it in a RecyclerView in your Android application. This approach not only simplifies your task but also introduces a clear structure to manage your data efficiently.
If you want to explore further, don't hesitate to customize the InfoBean class or improve the adapter to handle actions on the displayed items. Happy coding!
---
Visit these links for original content and any more details, such as alternate solutions, latest updates/developments on topic, comments, revision history etc. For example, the original title of the Question was: Json parser to RecyclerView in Android?
If anything seems off to you, please feel free to write me at vlogize [AT] gmail [DOT] com.
---
How to Build a RecyclerView from a JSON Parser in Android
Handling data in Android applications can often be challenging, especially when it involves parsing JSON and displaying it in a RecyclerView. If you've found yourself stuck trying to display data from a JSON response, you're not alone. In this guide, we'll simplify the process of parsing JSON into a RecyclerView by breaking it down step-by-step.
The Problem Statement
Imagine you have a JSON response that looks like this:
[[See Video to Reveal this Text or Code Snippet]]
Your goal is to display this data in a RecyclerView. However, you might encounter challenges when trying to access the JSON data and pass it correctly to your adapter. Let's solve this step by step.
Step 1: Create the InfoBean Class
The first thing you need is a model class to hold the data from your JSON. In our case, we'll create a class called InfoBean. This class will store each key-value pair from the JSON response.
[[See Video to Reveal this Text or Code Snippet]]
Key Components of InfoBean
Attributes: key and value to hold the corresponding values from the JSON.
Constructor: To initialize the object when new data is parsed.
Getters: To access the key and value if needed later.
Step 2: Parse the JSON
Next, you need to parse the JSON string to create a list of InfoBean objects. Here's how to do it:
[[See Video to Reveal this Text or Code Snippet]]
Explanation
JSONObject: Represents the overall JSON structure.
JSONArray: Allows us to handle the array of "info" objects.
We iterate through the JSONArray, extract each key-value pair, and instantiate the InfoBean class to store the data.
Step 3: Pass Data to the Adapter
Lastly, you will want to set up your RecyclerView and pass the infoBeanList as follows:
[[See Video to Reveal this Text or Code Snippet]]
This assumes you have an adapter class (e.g., MyAdapter) that properly handles the list of InfoBean objects.
Conclusion
By following these steps, you should now be able to parse JSON data and display it in a RecyclerView in your Android application. This approach not only simplifies your task but also introduces a clear structure to manage your data efficiently.
If you want to explore further, don't hesitate to customize the InfoBean class or improve the adapter to handle actions on the displayed items. Happy coding!
 0:25:07
 0:13:33
 0:08:35
 0:18:44
 0:05:11
 0:24:58
 0:08:23
 0:20:03
 0:07:28
 0:18:12
 0:14:58
 0:14:33
 0:20:28
 0:22:26
 0:08:06
 0:12:55
 0:16:44
 0:04:14
 0:43:56
 0:14:22
 0:18:21
 0:07:51
 0:00:15
![[Exclusive] Advanced RecyclerView](https://i.ytimg.com/vi/9lTL7PtQUjU/hqdefault.jpg) 2:08:40
2:08:40